Do Sesame Seeds Go Bad? – Storage Tips, Expiration, Spoilage Signs

Do Sesame Seeds Go Bad?: Do you have a bag of partially opened sesame seeds in your hand and are wondering, “Do sesame seeds go bad?,” or “How long do sesame seeds last?” If so, you are in the proper location. Sesame seeds are one of the pantry essentials since they give fries, burgers, and even steaks more flavor. Learn if sesame seeds go bad and how to detect if they have by reading about them below. Additionally, you will learn several hints for storing sesame seeds in this post.

Do Sesame Seeds Go Bad

Do Sesame Seeds Go Bad?

Yes, sesame seeds do go bad. They will get rancid much like other fatty and greasy foods. So, if you’ve been properly keeping your sesame seeds, you need not worried about them spoiling soon.

Sesame seeds’ oils begin to oxidize when they are stored in poor lighting or for an excessively long time after their expiration date, which is what causes its “Rancidity”! So it is best for you to avoid buying sesame seeds in bulk if they are not a regular item in your cupboard.

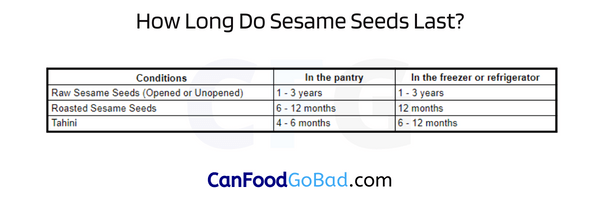
How Long Do Sesame Seeds Last?

Typically, sesame seeds have a “Best-by” date. However, rather than indicating seed safety, the date is a sign of seed quality. Sesame seeds continue to be edible much after their best-by date. The objective in this situation is to avoid the seeds becoming rancid since sesame seeds are not susceptible to bacterial or fungal deterioration. The longer the sesame seeds will last, the better your storage methods will be.

In general, raw sesame seeds have a shelf life of one to three years, but roasted sesame seeds have a shelf life of six to twelve months in the pantry and one to one year in the freezer.

ConditionsIn the pantryIn the freezer or refrigerator
Raw Sesame Seeds (Opened or Unopened)1 – 3 years1 – 3 years
Roasted Sesame Seeds6 – 12 months12 months
Tahini4 – 6 months6 – 12 months

How Long Do Sesame Seeds Last

How to Tell If Sesame Seeds Are Bad?

So, here’s how to determine whether or not opened sesame seeds in a bag that you’ve had for a very long time in your pantry have gone rancid.

Aroma: Sesame seeds often have a nutty, fresh scent. If the scent has become sour and off, you should head to the food store right away. Sesame seeds that have gone bad not only taste bad but are bad for your health as well. In other words, if your nose says “no,” it’s a no!

Flavor: Another effective method for determining if something is safe to consume is your sense of taste. Sesame seeds often have a nutty, fresh flavor. But if the flavor has changed and is now foul, you must discard the seeds. Who would want to ruin their cuisine with such disgusting toppings, right?

Molds: Molds enjoy food just as much as we do. So keep an eye out for this adversary. Sesame seeds don’t frequently contain molds. But if your seeds have come into contact with moisture, there is a good probability that mold will develop. Mold may be present if you see a white, gray, or black fuzzy matter inside the package or container of sesame seeds.

Do Check: Can Sesame Oil Go Bad

How To Store Sesame Seeds?

You now understand when to discard sesame seeds. However, are you aware of the best ways to keep them so you won’t have to throw them away before using them? We do, after all! We’ll also provide you with great sesame storage advice.

Airtight Container

Sesame seeds should, of course, always be kept in airtight containers with the lids on. Consider putting them in a plastic bag to keep them cool if you live in a hot region. Make sure to remove all of the air from a plastic bag before closing it if you’re keeping them. A kitchen cryovac machine can be used for this. This is the ideal course of action if you want to keep the seeds fresh for a long time!

Sesame seeds are known to support mold development and become rancid when exposed to air, which brings moisture into the seeds.

Cool and Dry Place

Sesame seeds should also be kept in a cool, dry location away from heat and sunshine. Rancidity is known to accelerate in the presence of heat and sunshine. Sesame seeds should, if at all possible, be maintained at a steady temperature because sharp temperature changes are bad for their quality.

Freeze or Refrigerate

In case you didn’t know, cooling and freezing seeds extend their shelf life by preventing rancidity. Additionally, seeds are kept at a consistent temperature in freezers or refrigerators.

Simply place the seeds in a freezer or refrigerator in an airtight container. Squeeze as much air as you can out of freezer bags if using them.

Tahini

Sesame seeds have a far longer shelf life than tahini. Therefore, making all of your sesame seeds into tahini at once might not be a smart idea if you bought them in bulk. Consider preparing tahini in bulk if you enjoy it and use it frequently.

In the refrigerator and freezer, tahini keeps for between 6 and 12 months and for around 4-6 months in the pantry. The taste of tahini improves with freshness, so you may start by creating a quantity that will survive for the first two to three months.

What Happens If You Consume Expired Sesame Seeds?

Consuming sesame seeds over their expiration date won’t likely make you sick because it is the date by which they are most likely to retain their quality and flavor. But the situation could not be the same if you eat moldy or rotten seeds.

However, there won’t likely be any detrimental effects if you eat a handful of rancid sesame seeds or even fewer. Nevertheless, it is certainly not a good idea to consistently consume rancid sesame seeds while being aware that they have gone bad.

In conclusion, you’ll probably be alright if you accidentally add a pinch or two of outdated sesame seeds to your dish. On the other hand, consuming too much of it may provide a number of health hazards.

FAQs on Can Sesame Seeds Go Bad

1. Can you freeze sesame seeds?

Yes, you can do that. If you freeze sesame seeds, they will be good to use for over a year.

2. What happens if you eat expired sesame seeds?

Since consuming rotten items normally has no immediate negative consequences, eating rancid sesame seeds or rancid tahini won’t make you sick, especially if you only eat a tiny bit of it. The worst that may happen is a few hours later, some mild intestinal problems.

3. How can you store sesame seeds?

In the pantry, sesame seeds can be kept in an airtight container in a cold, dark location. Sesame seeds, however, should really be kept in the freezer.

How Long Does Evaporated Milk Last? – When Does Evaporated Milk Go Bad?

How Long Does Evaporated Milk Last?: The process of discarding the water from fresh milk and heating up it again made the Evaporated milk. It is also called canned milk which is creamier compared to regular milk.

How long can evaporated milk last? Can be answered properly based on the condition you left. For more assistance can evaporated milk go bad? How to tell if canned milk is bad after opening? jump into the below sections without any delay.

How Long Does Evaporated Milk Last

How Long Does Evaporated Milk Last?

The shelf life of the evaporated milk is divided into two ways ie., opened and unopened. If your evaporated milk is opened then it lasts the quality of the item for nearly 2-5 days when you left in the fridge. If the canned milk is unopened then it lasts for a couple of months like 6 – 12 months past the date printed on the can.

Evaporated milk is shelf-stable and pasteurized and comes in cans and good packaging. Usually, canned food items last for a long time but it gradually drops their nutritional value. Also, any canned item (evaporated milk) is not encouraged to use the product after the expiry date. Refer to this table and remember every time when you purchase evaporated milk.

ConditionFridgePantry
Evaporated milk (unopened)Best by + 3 – 6 months
Evaporated milk (opened)3 -5 days

However, evaporated milk or any other food item can extend its shelf life depending on the maintenance and storage measures.

shelf life of evaporated milk

How To Store Evaporated Milk To Extend Its Shelf Life?

Evaporated milk can be stored in various ways like pantry, cupboard in the kitchen store, and refrigerator. As it is a canned good you can perform the ways of storage based on the condition it is. Check the approaches below and extend its shelf life:

Store in a Cool and Dry Place: When the evaporated milk can is unopened then the best place to store is in the pantry or cupboard or shelf in your kitchen. There is no point to keep the unopened can in the fridge so don’t waste the space.

Store in Refrigerator: If the evaporated milk tin can is opened, the perfect area to extend its shelf life is refrigerating. For better quality, transfer the remaining product to an airtight container, if not seal the product and keep it in an airtight bag or seal the can cap with aluminum foil and secure it with a rubber band.

How Long Does Evaporated Milk Last

How Can You Tell If Evaporated Milk Is Bad? | Signs of Spoilage of Evaporated Milk

Are you wondering How to Tell If Evaporated Milk has Gone Bad? Here is the discussion about the indication that tells if the evaporated milk goes bad or not.

  • Some of the common indications that make you realize when evaporated milk gets spoiled are color change, sour smell, lumps, or off taste.
  • All the dairy products when it is in open condition for more than a week in the best storage area, seem to be fine but not safe to consume anymore so discard the rest of the milk.
  • The most confusing sign of spoilage is the formation of the milk skin on the top. Actually, it’s just fat that got separated from the milk and formed on the top of the product so it’s safe to consume before it changes color.

What is Evaporated Milk?

FAQs About Can Evaporated Milk Go Bad?

1. Is it okay to use expired evaporated milk?

All are excited to know What happens if you use expired evaporated milk? Yes, it is okay to use expired evaporated milk but when it is unopened and damage-free condition. But don’t expect the same quality & taste after months past its best by date.

2. What does evaporated milk look like when it goes bad?

Evaporate milk look milky white in color, smooth in texture, and tastes creamy. If the evaporated milk goes bad then the color changes to yellow, sour smell, and even off taste.

3. Can You Freeze Evaporated Milk?

No, freezing evaporated milk is not recommended by some of the producers like a carnation. If you freeze the product it leads to separation after melting. So, the quality of the evaporated milk is not good as it was when you purchase it. Also, there is no point to freeze the unopened tin can of evaporated milk.

Key Outcomes

At last, we can say that the shared data in regards to How Long Does Evaporated Milk Last will help you to some extent. If you follow all the tips to store the canned milk then the shelf life got extended so that you can enjoy the product for a long time with fresh & original flavors. Need any guidance on other food-related inquiries, do visit or bookmark our site & fix the queries asap.

Fluffy Eggnog Pancakes Recipe: How To Make Eggnog At Home For Eggnog Pancakes?

Eggnog Pancakes: The holidays wouldn’t be the same without the perfect eggnog. However, you can’t kick off the day with your standard alcoholic drink. On this bright and cheerful Christmas morning, how else can you enjoy the flavor and aroma of eggnog? Eggnog pancakes are an option, for sure.

Now, with eggnog pancakes, you can experience the real deal of eggnog, in all its alcohol-free splendor, while also feasting on a phenomenally easy and delectable morning meal. That’s why we made this blog for all you pancake and eggnog fans out there! In this post, you’ll learn how to make the best eggnog pancakes ever—just in time for Christmas morning! Okay, let’s just jump in!

Eggnog Pancakes

How To Cook Eggnog Pancakes?

Now, our objective here is to learn how to cook eggnog pancakes right from scratch. Obviously, that includes understanding how to prepare eggnog! So, below, we have included a recipe for eggnog too!

Ingredients That You Need For Homemade Eggnog

Gather the following ingredients and get to work!

  • 4 egg yolks
  • 1/3rd cup of granulated sugar
  • 2 cups of whole milk
  • 1 teaspoon of vanilla essence
  • Half a teaspoon of ground nutmeg
  • A quarter of a teaspoon of ground cinnamon
  • 1/8th of a teaspoon of ground cloves
  • Half a cup of heavy cream

Instructions on How to Make Eggnog At Home

You’ll need to get your hands on all the right stuff before you can pour yourself a satisfying glass of eggnog. When you’re ready to get started, simply follow the instructions we’ve laid out for you!

  • Get the largest vessel you own to use as a mixer. Put the egg yolks and granulated sugar in the basin. Give it vigorous whisking until the mixture is light and airy. You should aim for a satisfyingly smooth texture.
  • Now, while still using the same mixing bowl, gently pour in the milk along with the rest of the ingredients. Don’t leave out the cloves, cinnamon, vanilla extract, or nutmeg powder. Whisk constantly as you go. If you don’t want lumps to develop, here’s a helpful hint: whisk constantly as you add these components.
  • The next step is to activate the cooker and adjust the heat to medium. The eggnog pancake batter must not be overcooked. Put the contents of your mixing bowl into a suitable saucepan and set it over medium heat. The purpose of this step is to thicken the batter a little bit. If you cook it for around 10 minutes over medium heat, you should have the desired thickness.
  • When the timer goes off, gently take the pan from the burner. The heavy cream should be added to the eggnog mixture while it is still hot and stirred gently. Be sure the cream is well incorporated. Any clumps in the mixture may be easily removed by straining.

Voila! You may now drink your eggnog in comfort. We suggest putting it in the fridge to cool down for a bit once all your hard work is done so you can enjoy it at the ideal temperature.

Related Posts: 

Items You Need For Making Eggnog Pancakes Recipe

Here is a list of items you have to gather to prepare the pancakes with eggnog. So, let’s do that first:

  • All-purpose flour – 2 cups
  • Melted and unsalted butter – 2 tablespoons
  • Ground cinnamon – 1 teaspoon
  • Granulated sugar – 2 tablespoons
  • Baking powder – 1 teaspoon
  • Ground nutmeg – 1/2 teaspoon
  • 2 large whole eggs
  • 1/2 teaspoon of salt
  • Baking soda – 1 tsp
  • Whipped cream and nutmeg for topping
  • Homemade or store-bought eggnog – 2 cups

Instructions on How to Make Eggnog Pancakes

Follow these instructions to the t and you will be able to enjoy your fresh batch of eggnog pancakes in no time!

  • The very first step will need you to bring out your largest mixing bowl. Add the flour, baking powder, sugar, baking soda, nutmeg, cinnamon, and salt into the bowl and mix it all together really well. Make sure that the entire powder has a uniform consistency all throughout.
  • In another bowl, add the eggnog, whole eggs, and unsalted melted butter. Whisk these ingredients together extremely well and gradually pour the dry mixture into the bowl. Make sure that you do this very slowly to ensure that there are no lumps in the final pancake batter.
  • Once the batter is ready, place your skillet on a flame and set the flame to medium heat. Grease the skillet with the unsalted butter and then pour the batter into a neat circle on the skillet. Cook each side for about three minutes and then flip it! A great visual indicator to rely on while making pancakes is the golden brown coloring on its surface. When you observe this color, it means that the pancake needs to be flipped onto the uncooked side!
  • When you have stacked up a bunch of pancakes, top it off with whipped cream and a little nutmeg powder!

Look More: 

How Long Does it Take to Fully Cook Eggnog Pancakes?

All in all, preparing eggnog pancakes for one person should take a total of 20 to 25 minutes. This is, of course, only possible when you have prepared the eggnog beforehand and stored it in your refrigerator!

If, however, you are preparing eggnog also from scratch and then cooking the pancakes, it could take you from 45 to 50 minutes to cook a stack of eggnog pancakes. This also depends on how proficient you are in the kitchen. Therefore, expect a variation of 5 minutes whenever you decide to cook eggnog pancakes!

How to Store Fully Cooked Eggnog Pancakes?

Knowing how to store eggnog pancakes is crucial, particularly if you want to have a cold, premade breakfast on the go. The flavor and consistency of eggnog pancakes should be OK if you store them properly.

The pancakes need to cool completely before you can begin storing them. Pancakes should be allowed to cool to room temperature and not be giving off any vapours. There will be no pooling of moisture or steam that might otherwise make the pancakes mushy.

Now that you know the key to keeping your eggnog pancakes from becoming mushy in storage, you can go on with your day. You may use any kind of sealed container to complete the job. Make use of a plastic bag, ideally one with a closure.

Try to stack the pancakes with a sheet of parchment or wax paper in between each layer. You can separate them without difficulty before reheating them since they won’t stick together.

The pancakes can keep for a few days if you put them in the fridge. Once again, an airtight container is required for the pancakes. If you keep the pancakes in the fridge, they will last for approximately 4 days. Your eggnog pancakes will keep for approximately a month if you freeze them.

Do Check: 

How to Serve Eggnog Pancakes?

Eggnog pancakes would probably steal all the thunder at your breakfast table anyway. However, we are big fans of mixing up our breakfasts from time to time. And we assume you would like variety as well. Therefore, here are some of our favourite ways to serve eggnog pancakes.

Serving eggnog pancakes with whipped cream and fresh fruit, such as strawberries, blueberries, or raspberries, is a simple and traditional option. You can also serve eggnog pancakes with a generous amount of maple syrups and crushed nuts if you enjoy sweet crunchiness.

One of our personal favourites is a syrup that is essentially an eggnog concentrate. Just top off your eggnog pancakes with a small drizzle of this syrup and feel your senses get enthralled with the overpowering taste of eggnog! If you want to deviate from conventional tastes, you can also opt for a gathering of cinnamon cream cheese for a slightly savory taste instead of a sweet one!

Tips To Make Eggnog Pancakes

Eggnog pancakes are somewhat complex to cook. However, it is a delicious preparation to eat. That said, here are some tips and tricks that will make the process of cooking eggnog pancakes substantially easier!

  • If your goal is to cut into the fluffiest and airiest pancakes in the world, we can make that happen. But, not with only all-purpose flour. Rather, we would have you mix some all-purpose flour with cake flour and then prepare the pancake batter as you would normally.
  • This probably will not come as a surprise to you but you can consider this as a nagging reminder to prepare every aspect of eggnog pancakes at home. And that, naturally, would include the eggnog. Even though preparing the eggnog itself takes about 20 minutes, we have never regretted the extra wait time for the improved taste!
  • At no point during the time that your skillet is on the flame should the flame be set to high. We promise you that if you keep the heat set to medium throughout the time that your pancake is cooking, you will be able to enjoy extremely uniformly cooked pancakes that have caramelized just ever-so-slightly.
  • As much as you may feel the urge to stack your pancakes on top of each other, we would advise against it, especially if your pancakes are fresh off the skillet. The reason?
  • Stacking the pancakes on top of each other prevents the release of the vapor. On the contrary, all the vapor percolates in the stack of pancakes itself, leading to soggy and soft pancakes. And that is something that we certainly do not want!

Read More: 

FAQs About Eggnog Pancakes With Pancake Mix

1. Can you use pancake mix to cook eggnog pancakes?

Yes, you can use pancake mix to cook eggnog pancakes as it makes your job done so easily. Keep the rest of the efforts in making eggnog, if you prefer homemade eggnog.

2. Can you add alcohol to your eggnog pancakes?

Yes, you can add alcohol to your eggnog pancakes but in making the eggnog because traditionally eggnog recipes use alcohol.

3. How to prevent eggnog pancakes from sticking to the skillet?

In order to prevent the eggnog pancakes from sticking to the skillet, you should first heat up the skillet sufficiently. Once you have done that, you can spray some cooking oil or unsalted butter onto the skillet and then pour the batter over that! Your pancakes will not stick to the pan after this.

Final Words

And that is everything you need to know about eggnog pancakes. Just remember that while you can source store-bought versions of every aspect of this pancake recipe, you will be able to enjoy a much better taste if you make the eggnog and the pancake batter at home itself! Happy cooking with other recipes too like IHOP Pancakes, Coconut Flour Pancakes, and more.

Does Brownie Mix Go Bad? – Is It Safe To Use Expired Brownie Mix?

Does Brownie Mix Go Bad: For all those who don’t know, brownie mixes are generally a sugary, semi-solid readymade mix of chocolate, flour, and ganache present over the counter to be mixed as they are, in any brownie recipe.

If you have clicked on this article you must have come across an old box of brownie mix somewhere inside your kitchen pantry and must be wondering whether you can still use it in your brownie recipes or whether brownie mixes expire.

Well, stay tuned to this article and find out all the necessary information on does brownie mix goes bag, to deal with storage methods, spoilage signs, and shelf life of brownie mix. 

Does Brownie Mix Go Bad

Does Brownie Mix Go Bad?

Not really, brownie mixes do have a pretty long shelf life if stored properly in an airtight container in a cool and dry place. Generally, brownie mixes don’t go bad in a way that they get extremely unsafe for your body, but also they don’t last forever. The authentic quality of the brownie mixes can degrade which will not give them the right texture or taste as before.

The ingredients used to make brownie mixes are flour, chocolate, salt, sugar, and a leavening agent like baking soda, sometimes sodium bicarbonate or baking powder which is a raising agent that doesn’t have the potential to remain good for long. So if this raising agent has turned bad then your brownie will have a super flat and soggy texture which will be of no use and hence you will have to throw it out.

Do Check: Can Brownies Go Bad

How Long Does Brownie Mix Last After Expiration Date?

We don’t recommend this, but you can still use brownie mixes in low quantities for more than 3 to 6 months after the expiration date mentioned on the label. Once this time span is passed, the raising agent or baking powder will lose its potency totally and the brownies will start having a wet and sluggish texture inside rather than being soft and moist. Now you must also be wondering how to store brownie mix properly. Check the below module for a deep idea.

Does Brownie Mix Go Bad

How To Store Brownie Mix?

To store brownie mixes well, it is always recommended to store your unopened brownie mix in a cool and dry storage option. A kitchen cupboard in your pantry away from direct sunlight or oven heat would be just enough.

Make sure you don’t keep the bottle of brownie mix too close to the oven while baking, just takes the precise amount of the mix that you need for that particular recipe and keep the rest back in a cool place and cover immediately.

Another good option for storing brownie mixes is to keep them inside an air-tight container and freeze them. If you have a query like Can Freeze Brownies? click on the link and clear it. If you use freeze-safe Ziploc bags, make sure the bags have been properly squeezed out of the air and then kept in the freezer so that your brownie mixes are not only unexposed to air but also stay moist from within.

Moisture is also responsible for degrading your brownie mixes, so it is best to be kept in their original steel container for as long as possible with dish towels to soak up the excess moisture due to condensation.

Is It Safe To Use Expired Brownie Mix?

Technically yes, you can have expired brownie mix if it is only three to six months past the date mentioned on the label. Though the date mentioned is not the expiration date but is basically the best use-by or best-before date which is an estimated time for the brownie mix to retain its quality.

Now, you must be wondering how to revive expired brownie mix in a way that they don’t harm much. Since the leavening agent is the one to lose its potency, adding a bit of baking powder as the bonding agent to make up for the lost potency would be a great idea to revive your brownie mix back. Let’s see how you can do this:

  • Firstly, check if your brownie mix has baking powder, baking soda, or sodium carbonate as its evening agent.
  • Next, find a brownie recipe that is similar to your mix, has a similar size and texture, and the brownie using the same raising agent.
  • Next, you need to measure and add the exact quantity of raising agent that has been used in that recipe, and now once your brownie mix is ready you can use it for up to 12 to 18 months straight. Even though we cannot guarantee the results, your brownie mix will have its lost potency back partially if not fully.

If you do not have any raising agents available, another great option for reviving old brownies with their original flavor is frosting them. You can use premade frosting or chocolate ganache to frost your brownies and boost up the lost flavor and consistency in them.

What Happens If You Use Expired Brownie Mix?

If your brownie mix has passed years after the expiration date, then it is strictly recommended to throw them out and replace them with fresh ones, otherwise, it may result in food poisoning and health issues like fungal infection inside the stomach. People with high blood pressure and lower metabolism are strictly recommended to stay away from brownie mixes that are too old.

Related Posts: 

How to Tell if Brownie Mix is Bad?

Honestly, it is slightly difficult to tell if the brownie mix has gone bad or not. Still, you can look at the below-mentioned factors before adding them to your next batch of brownies:

Smell-

Brownies generally have a neutral smell or can give out a slight hint of sweet aroma due to the high concentration of sugar as one of its main ingredients. However, its smell might be slightly changed if they are kept for long periods of time passed the expiry date. The raising agent of baking powder or sodium bicarbonate may lose its potency and get decomposed with time will distinctively give out a sour or pungent smell.

Consistency- 

When we combine brownie mixes with other ingredients like eggs, water, and flour, normally they are supposed to mix perfectly and give out a fluffy and thick consistency. That actually happens due to the presence of baking soda. If the baking soda has already gone bad then your brownie mix will neither properly mix up with other ingredients nor will it give a nice consistency. Instead, you may see a runny and soggy texture.

Appearance- 

While adding your brownie mix with other ingredients of your brownie if you see there is a slight change in the appearance due to mold and mildew, it is also another clear indication that your brownie mix has turned bad.

FAQs on Do Brownie Mix Go Bad?

1. How long do brownie mix brownies last?

Brownie mixes can last for about 3 to 6 months more from the dates mentioned on the labels and if you happen to revive the bonding agent by adding a higher potency baking powder or sodium bicarbonate or frosting the mix with chocolate ganache, then they can last for more 12 to 18 months.

2. Do brownies really expire?

Technically brownies don’t really expire that bad with time, but their quality, texture, and taste degrade because of a leaving agent like baking powder that binds its other ingredients together, loses its potency with time, and makes the brownie’s outer texture sloggy.

Nutshell

So that was all about brownie mixes and how to revive expired brownie mix to be used in current recipes. Brownie mixes lose their authentic taste and freshness with time. If it has passed years, then it is best recommended to throw them out immediately.

If you are a fan of brownie mixes and are worried about does brownie mix go bad? Then follow all the instructions mentioned in this article and also don’t waste a single bit of them. Well, that’s it for today, we will meet you next time with one more food item on Canfoodgobad.com

15 Yummy Pancakes Toppings List to Enhance Your Pancakes Taste

Pancakes Toppings: We all love to have pancakes even as a snack or for breakfast. This recipe is preferred by all because of its ease of preparation and the way it takes fewer ingredients.

With different sorts of toppings on the pancakes you can have different tastes every day. If you are bored of having the same taste of pancake every day, all you have to do is change the taste.

Through this article, we will showcase some of the delicious flavors that you can use for daily pancakes. These new toppings will give a completely new dimension to the regular pancake’s taste. Check out the below sections of the top 10 pancake toppings for toddlers & all age groups.

Pancakes Toppings

Top 10 Pancakes Toppings For Fun & Wholesome Breakfast

Pancake toppings completely change the taste of regular pancakes. Are you looking out for something that can make your tastebuds enhanced? This list of pancake toppings will definitely blow your mind.

  1. Lemon and Sugar Mix for Pancake Topping
  2. Chocolate and Nuts Spread
  3. Slice Bananas with Honey
  4. Greek Yogurt Spread
  5. Apple Sauce with Honey and Brown Sugar
  6. Honey and Dried Coconut Flakes
  7. Peanut Butter with Blueberries
  8. Cinnamon Sugar Topping
  9. Cheese Cream with Chocolate Chunks
  10. Olive Oil and Goat Cheese Spread

Apart from the recipes below for toppings, you need to check out articles on Eggnog Pancakes.

Lemon and Sugar Mix for Pancake Topping

If you love the taste of sweet and sourness together, do try out this topping for your pancakes. You can take fresh lime and squeeze out the juice from it and mix it with sugar for a nice consistency of syrup. Add this lemon and sugar mix syrup to the top of the pancake and you will love the taste afterward.

The use of lemon helps in keeping your blood circulation at a good rate. Moreover, the sugar added to the lemon gives it a caramelized touch. The blend of sweetness and sourness gives a completely new taste to your pancakes.

Chocolate and Nuts Spread

If you want to make your pancakes sweeter and like it that day, try out this topping. Using chocolate along with crunches of nuts for the toppings of the pancakes will give a sweeter flavor and the nuts will give a nice crunch as you take each bite.

Prefer using dark chocolate because it contains components that can boost your mood and release anxiety. Chocolate and nuts are both the prime source of energy and boost your body throughout the day. This pancake topping is healthy and easy to prepare.

Slice Bananas with Honey

You can simply make a regular pancake and then enhance its taste and texture with some thinly sliced bananas and honey. The addition of honey will help you maintain your diet and the slice of fresh bananas will give a nice creamy texture to your pancakes. Bananas are also great for providing you with energy throughout the day.

This particular topping for pancakes will change the taste of your regular pancakes. Moreover, this topping is preferable for a post-workout meal.

Related Posts: 

Greek Yogurt Spread

Yogurt is known for its rich source of protein. Protein helps in rebuilding the muscles post-workout when your body is at rest. Moreover, yogurt is made of fermenting milk and therefore it includes probiotics.

The probiotics help in proper gut flow. Greek yogurt as compared to other yogurts contains low-fat content and therefore this spread is great for pancake topping. The creamy texture of the yogurt goes well with the tender pancakes and it tastes exactly like having butter with pancakes.

Apple Sauce with Honey and Brown Sugar

If you love to have apples with pancakes, this topping is a great choice. Get some fresh apples and cut them into slices. Add the slices to a pan and saute them with honey and brown sugar. The brown sugar will give a caramelized touch to your toppings making it so delicious along with the fluffy pancakes.

Apples are also a rich source of fiber and will keep your body hydrated. The natural sweetness of the honey and brown sugar helps you to avoid using refined sugar content in the pancake batter. The sweetness and slight bitterness of brown sugar balance the flavors well.

Honey and Dried Coconut Flakes

Honey is always a preferable option to choose because of its natural sweet content. It allows you to maintain weight and remain energetic. The use of coconut flakes here in this pancake topping recipe is a game changer.

You may not find fresh coconut flakes every time in the market, so you can always have the option to use dried flakes. The sweetness of the coconut flakes is always at the required level. Dried coconut flakes add a crunch to the fluffy and tender regular pancakes. Moreover, they help you in improving energy levels.

Do Look At:

Peanut Butter with Blueberries

Peanut butter contains nutritional benefits and lower fat content as compared to regular butter. The addition of blueberries along with the butter helps in enhancing the taste. There is always a balance of sweetness from peanut butter and sourness from the blueberries.

You do not have to add any extra sugar content with this topping for regular pancakes. Peanut butter is an easy source of protein intake. Therefore, what else can be a better choice for toppings if you can have something healthy as well as tasty at the same time?

Cinnamon Sugar Topping

The use of cinnamon as a topping changes the entire taste of your pancakes. The awareness and sweetness of the cinnamon give a nice balance to your “out of the pan” pancakes at the morning breakfast table. Moreover, cinnamon also gives a nice aromatic taste to your taste buds.

You need to add a pinch of ground cinnamon to the sugar powder and use it as a topping for the pancakes. If you do not want to have high-sugar content pancakes, this topping recipe is all for you.

Cheese Cream with Chocolate Chunks

Now add a creamy texture to your regular pancakes with this topping of cream cheese with chocolate chunks. We all love to have some crunch with creamy textures. The chunks of dark chocolate will give a hint of bitterness to the sweetness of the pancakes.

Moreover, you can also taste the balance of tanginess coming out of the cheese cream, however, the taste will be very mild. The reason you should use this as a topping for pancakes is because these ingredients are easily available and you do not have to cook it as well. All you have to do is add the cheese cream to the topping and use chunks of chocolate.

Must Check: 

Olive Oil and Goat Cheese Spread

When you are confused and do not want to prepare something sweet for your pancakes topping, try out this recipe for sure. The use of olive oil to make the spread will give a creamy texture to your topping spread.

The addition of goat cheese in the spread helps in retaining the texture. Goat cheese is easy to digest as compared to cow’s cheese. This spread is healthy and comes with nutritional value. Goat cheese preferably contains low-fat content than other forms of cheese.

List of Other Pancakes Toppings To Fill Your Snack Plater

The top 10 pancake toppings that we have mentioned above aren’t enough for having pancakes for everyday breakfast. So, we will be listing down some of the other pancake toppings that you can try out too.

  • Maple Syrup Topping
  • Strawberry and Cream Cheese Spread
  • Honey-glazed Bacon Crunch Spread
  • Sea Salt and Olive Oil Syrup
  • Mashed Bananas with Coconut Cream Spread
  • Basic Powdered Sugar
  • Cheese and Herbs
  • Whipped Cream with Fresh Fruit Slices
  • Cinnamon Powder with Mangoes Spread
  • Matcha Powder with Melted White Chocolate

Tricks and Suggestions While Choosing Pancake Toppings

This section is all about tips and suggestions which will help you to make a worth-trying pancake topping.

  • Always use ingredients that are helpful in binding up all other flavors in the recipe. If you are going to use naturally sweet ingredients like bananas, maple syrup, honey, etc., make sure you are not using any extra sugar in the pancake batter.
  • Also, try to pick out fresh ingredients for making spreads for the toppings of pancakes. If you are using bacon, you can always use honey and brown sugar to balance the flavors.
  • To bring a change to the creamy texture of the pancakes, always choose an ingredient that can bring change to your taste buds. For instance, add chocolate chunks, coconut chunks, etc., for extra crunch and you will love every bite.
  • While making pancakes you can use honey in the batter for sweetness and use buttermilk. Using these ingredients makes your pancakes healthier and you can have them without thinking twice.

Read More: 

FAQs on Best Pancake Toppings For Kids

1. Can you pre-made toppings for pancakes?

Yes, you can always make toppings beforehand if you follow the correct process to do so. Some of the common toppings like whipped cream and honey syrup with nuts could be kept in the fridge for weeks without any issue.

2. Can I use store-packed toppings for pancakes?

Yes, these toppings last longer due to the use of preservatives in them and will give a good hint of flavors as well. But, self-made toppings do not use preservatives and thus turn out to be healthy

3. What can I top pancakes with besides syrup?

There are plenty of options for pancake toppings other than syrup. Want to check out some of them? then check here:

  • Fruit Compote.
  • Fresh Fruit.
  • Chocolate Sauce or Hazelnut Spread.
  • Vanilla yogurt, granola, and raspberries.
  • Bourbon Caramel Sauce.
  • Cinnamon Butter.
  • Almond butter, sliced apples, and honey.
  • Applesauce, cinnamon, and chopped walnuts.
  • Jam and many more

Key Takeaways

The information provided in this article will help you to enhance the flavors of your regular pancakes. Also, you can take your breakfast and brunch ideas to the next height. The tips and tricks mentioned in the article aid in making a better topping for your pancake.

Now that you have read through the complete article, we are sure you will amaze your guests with unique pancake toppings. To know more about articles such as Old Fashioned Pancakes Recipe do bookmark our official page.

20 Best & Healthy Breakfast Potluck Ideas To Fuel The Fun

Breakfast Potluck Ideas: Every year we all choose to organize a potluck meal with our friends and family. Especially on Thanksgiving, potluck breakfast table ideas are very common. For a potluck breakfast, it is often difficult for us to choose a special recipe that everyone at the table will love to eat.

So, through this article, we are going to present some amazing potluck breakfast ideas to fuel up the fun of the gathering. Check out the complete article and pick out one of your favorite meal ideas for breakfast that we will be presenting below.

Breakfast Potluck Ideas

Top 10 Potluck Breakfast Ideas To Energise The Event

Potluck recipes are not only served for breakfast, they are great for any event. In this article, we will share recipes starting from sweet to savory, which is perfect for any gathering. You can now be ready to please your guest with these top 10 mouthwatering potluck breakfast ideas.

These recipes will be easy to prepare and will take you less time. Moreover, you can serve it for any special occasion. You can also check out recipes like French Breakfast Foods.

Turkey Burritos

Burritos are one of the easiest and most wholesome recipes that you can prepare for a breakfast meal. Instead of using chicken or fish, you can choose to add turkey slices for this breakfast burrito which will make it extra healthy. Turkey being rich in protein is great for post-workout potluck breakfast ideas. We all choose to have something healthy to kick off the day positively.

Turkey has nutritional properties in higher content as compared to other meat like pork, chicken, and beef. Moreover, turkey meat contains lower fat as well. So, preparing some breakfast burritos for breakfast seems to be a great idea.

Cinnamon Rolls

If you are organizing a potluck breakfast meal, having something on the sweeter side is very important as well. So, let us choose cinnamon rolls for the dessert section. Prepare some soft and tasty cinnamon rolls for breakfast and we are sure that your guest will love the cheese cream filling for the rolls.

Instead of using the sugar coating above, you can skip that to make it healthy and less fulfilling for breakfast. To save your time in the morning you can choose to prepare these cinnamon rolls the day before. On the potluck breakfast meal day, you can serve piping hot rolls pulling them out directly from the microwave.

Related Posts: 

Cheesy Egg Muffins

You might be wondering why muffins have turned out to be savory?

Yes, instead of making sweet muffins that you always prepare on regular breakfast meals, now choose to turn them into savory ones. These savory cheesy egg muffins are fulfilling for potluck breakfast meals and will provide enough protein.

Eggs are creamy in taste and the addition of cheese on it will give your taste buds a different kick of flavours. The cheese will blend off all other flavours of the muffins. Moreover, muffins are great in size for small bites and you can enjoy having other recipes presented at the potluck breakfast table.

Banana Cookies

Get yourself prepared to make some banana cookies for a potluck breakfast meal. For preparing banana cookies, the first important thing that you need to consider is to use some ripe bananas for the recipe. The use of ripe bananas will add natural sweetness to the recipe making it healthy.

You do not have to add extra sugar to the cookies. These cookies could be premade and packed in airtight containers. If you want to have some warm cookies, you can add these to the microwave and that will make it soft for serving to your guests. These cookies go well with black tea and coffee on the breakfast table.

Ham and Cheese Pie

Ham and cheese pie is very easy to prepare and takes less time compared to other recipes to prepare for breakfast. If you want to customise the pie you can add fresh vegetables as well to enhance the taste.

To make the pie crust flaky you can use some butter while making the dough or add some oil. Try out making this recipe for breakfast and you won’t regret it. Ham is a rich source of protein and that is the reason you can always choose to have this recipe for breakfast.

Also Refer: 

Fruit-Salad Recipe

This recipe might seem to be simple but this recipe engages well with the potluck breakfast meal. The mixture of fresh fruits provides nutritional content for your body. Moreover, the fruits are rich in fiber and will keep you hydrated throughout the day.

Try out this fruit-salad recipe and you will have a light breakfast with an amazing touch of flavors. Some fruits are sour, and some are sweet and therefore the flavors are balanced. The natural sweetness of the fruits is great and you do not have to add extra sugar content to the salad.

If you want to make it extra healthy you can always choose to use some greens in the salad.

Buttermilk Blueberry Pancakes

Pancakes are the go-to recipe when it comes to having a potluck breakfast meal. This recipe is easy to prepare and takes fewer ingredients for preparation. The use of buttermilk instead of regular milk helps in reducing calorie intake and decreases chronic diseases. Moreover, buttermilk has a lower fat content.

The use of blueberries gives a tangy flavour to the pancakes which balance the sweet taste of it. The blueberries add a nice colour to the pancakes and make them presentable for any occasion. This pancake recipe takes less than 30 minutes to prepare and you can prepare them anytime.

Breakfast Mango Smoothie

Mango during its season comes with high natural sweetness content which makes it delicious and healthy for breakfast smoothies. You can add some nuts and milk for extra flavour to the mango smoothie. Mangoes come with high water content which helps your body to remain hydrated for the day.

Moreover, mangoes are great for proper blood circulation. So, having a mango smoothie in the morning helps you remain active. Choose to make some tasty and healthy mango smoothies for a potluck breakfast table for your guest and you will enjoy every sip of it.

Do Read: 

French Toast with Cinnamon

This is again a common and most-chosen breakfast recipe that you can prepare for the potluck. The sweetness of the fresh toast combines really well with the warmness of the cinnamon. Moreover, cinnamon adds an aromatic touch to your French toast. This recipe can serve as a main course for the breakfast table as well as a dessert.

Cinnamon also helps in the circulation of blood cells and maintains proper sugar levels. The kind of bread you are using for preparing French toast is also remarkable. You can choose brown bread or whole wheat bread for making the recipe.

Smoked Salmon with Greens

If you want to present something that is heavenly and delicious in flavors and also gives a healthy bite to your guest, choose to prepare this smoky salmon recipe with a green salad. The creaminess of salmon and the crunch of green gives a perfect taste. Salmon is a rich source of protein and therefore goes well for a potluck breakfast table.

Add some olive oil and lemon as seasoning for your salad and the flavors go well with each other. The use of greens gives you enough fiber content for keeping your body hydrated for a long day. Moreover, this recipe comes with low saturated fat and therefore acts well as the first meal of the day.

List of Other Potluck Breakfast Foods To Cheer Up Your Day

The list of potluck breakfast ideas that we have mentioned above is not sufficient for you. We understand that. This is the reason, we will list down some other recipes that you can prepare for the potluck breakfast table. Check out the below list:

  • Overnight Soaked Oats with Blueberries
  • Whole Wheat Chocolate Cookies
  • Fresh Fruit and Hung Curd Bowl
  • Egg and Bacon Sandwich
  • Waffles with Bananas
  • Avocado Toast with Bacon
  • Chicken Salad
  • Sausages and Fruit Salad
  • Chicken Tortillas
  • Coconut Milk Pudding with Chia Seeds

Why Do People Choose to Organise Potluck Breakfast

There are several reasons why individuals choose to organize a potluck breakfast feast. Let us put light on some of the significant reasons behind this.

Share and Socialising: A potluck breakfast meal allows individuals to connect with each other. This meal acts as a get-together with some good food and flavours.

Share the Load: Instead of preparing an entire meal for all, a potluck breakfast meal enables one to share the load of work. When each individual present in the meal brings their own recipe, the load of work is shared and everyone is able to enjoy the occasion.

For Variety and Different Taste: When you cook food for all you will cook things that you know well. But, in a potluck culture, every individual will bring one dish and that dish will be completely different in taste and texture from someone else’s dish which gives a variety of options for all.

Read More:

FAQs on Easy Store-bought Potluck Breakfast Ideas for Amazing Get Together

1. How much food is required for a potluck breakfast meal?

Well, that depends upon the gathering in the potluck meal. You can ask the organizers about the headcount and then decide on the portions to carry for the potluck party. Moreover, when it’s a breakfast potluck table people often choose to eat less since that will be the first meal of the day.

2. What are the general rules for potluck?

If you have ever been there for a potluck meal make sure you bring a dish of your own for the party. You need to serve your food and provide assistance to others when you need to know about your dish. Be mindful of the leftovers.

3. What is good to take to a breakfast potluck?

There are numerous food options that can be taken to a breakfast potluck such as:

  • Eggs Benedict Breakfast Pizza.
  • Scrambled Egg Muffins.
  • Lemon Poppy Seed Bread.
  • Chewy Granola Bars.
  • Overnight Cinnamon Rolls
  • Donut Muffins.
  • Baked Ham and Cheese Party Sandwiches.

Key Takeaways

This article on breakfast potluck ideas covers almost all aspects that you need to know about the potluck. The recipes mentioned above are great to pick for a potluck meal. If you think, we can add some other dishes as well for potluck, please share your comments below. Do check out other recipe-related articles like Father’s Day Breakfast Ideas on our official website. All you have to do is to bookmark it.

12+ Easy Polish Breakfast Recipes That Come Under Polish Cuisine – What Do Polish Eat For Breakfast?

Polish Breakfast Recipes: Are you surfing the internet to explore some of the authentic and signature Polish foods? Then we have the good news for you and you have aware of that too. It’s nothing but information on Polish breakfast recipes that are Polish. For all excited people and native poles viewing this guide, let me share you with some of my favorites and the great Polish foods that blow your mind.

polish breakfast recipes

Top-Best Polish Breakfast Recipes To Try In 2023

Get brief details about the Polish recipes from the below Polish foods, be native & cherish the feel of Poland cuisine. The Polish breakfast recipes provided here will make you enjoy your meal on busy mornings too. So jump into the list of 7 best Polish breakfast recipe ideas & try:

  1. Racuchy (Polish Apple Pancakes)
  2. Polish Breakfast Sandwich Kanapka
  3. Jagodzianki (Polish Sweet Buns With Blueberries)
  4. Milk Soup with Drop Noodles
  5. Scrambled Eggs With Chanterelle Mushrooms
  6. Semolina Porridge
  7. Polish Coffee Cake

Racuchy (Polish Apple Pancakes)

A dish that was loved by all the age groups across Poland is this Racuchy. A Polish apple pancake Racuchy recipe is a fluffy and delectable sweet dish like authentic pancakes. The ingredients you found in this Polish breakfast recipe are flour, sugar, apples, eggs, warm milk, and yeast. These staple kitchen items will surely mesmerize you with their fantastic texture and flavors.

Polish Breakfast Sandwich Kanapka

One more commonly used Polish breakfast food to have in every morning meal is Kanapka. This Polish Breakfast Sandwich Kanapka Recipe can be served in many meals not only as breakfast. As it is an authentic Polish breakfast sandwich dish, 90% of poles couldn’t stop themselves to eat.

This sandwich recipe is different from the original sandwich because this is an open-faced sandwich which was the French country’s idea. You can make two flavors of Polish sandwiches (sweet and savory). The traditional Polish Sandwich Kanapka is made of bread, butter, veggies, ham, sausage, mayo/mustard/ketchup, and boiled eggs.

Also Read: 

Jagodzianki (Polish Sweet Buns With Blueberries)

A jagodzianki is a traditional soft and sweet Polish bun loved by Poles in Poland. Did you know? The Polish word for blueberry is Jagoda. Hence, the name of this recipe is Jagodzianki. It is a summer dish. You will find the ingredients like blueberry, flour, yeast, milk, and egg. A juicy blueberry sauce in the middle of the sweet bun will blow your min after taking a bite. So it’s highly recommendable to experience the terrific sweet Polish dish.

Milk Soup with Drop Noodles

Zoo-pah meh-tschnah is the Polish word for milk soup. A staple kitchen ingredient called milk is the major component in this recipe. Also, other items for this recipe can be available easily at any grocery shop so be ready with the things and enjoy the pretty famous Milk soup with drop noodles as a Polish breakfast meal.

All the technique you should implement in making this milk soup is dropping the noodles perfectly into the hot milk. Take a spoon to scoop the batter and pour it slowly.

Scrambled Eggs With Chanterelle Mushrooms

One of the non-imagined and deadliest combinations is eggs and mushrooms. Have you ever tried this combo? If not, then don’t miss to try scrambled eggs with aromatic chanterelles polish breakfast recipe. This can be turned into a favorite breakfast too so make this dish between June to October and enjoy the summer effect.

The major ingredients you need for this recipe are Eggs, Chanterelles mushrooms, onions, butter, and other spices that can be readily available in the market or stores. Serving the dish with extra toppings like a pinch of hives and ground black pepper is the best & delicious

Related Posts:

Semolina Porridge

Semolina is a good source or ingredient for thickening any type of food like paste, pudding, couscous, etc. So it is a staple ingredient in some dessert-making kitchens. This is also known as Kasza manna and it relates to purified middlings of durum wheat.

By using this semolina in this recipe, you will experience rich and creamy porridge. This dish is one of the famous Polish breakfast foods for toddlers as it includes numerous nutritional benefits and is pretty good at digestion too.

By adding more toppings and other addons it enhances the taste and becomes a delicious recipe for poles to have in the mornings. The items you can add to semolina porridge are jam, fruits, chocolate, nuts, dry fruits, and more. To spice up the dish just sprinkle ground cinnamon or nutmeg a bit.

Polish Coffee Cake

If you are a coffee lover and wanted to try any of the authentic Polish dessert breakfast recipes, then Polish coffee cake is the best one to try. As it is a traditional yet lip-smacking yeast-raised dish that can’t be left behind when trying Polish recipes. You can enjoy this perfect fluffy cake together with crump toppings with your cup of coffee and live the moments.

When you add an extra amount of ingredients to the recipe, it turns out to be the best crumbly topping polish cake. If you miss this step, it results as dry and too dense. One more important tip to follow after baking the cake is to rest it for some time at room temperature and enjoy its crispness on the top while taking a bite.

Read More: 

List of Other Authentic Polish Breakfast Recipes

Don’t match your taste with the above-mentioned Polish recipes for breakfast? Not to worry at all! Here are a few other easy-to-make and delicious Polish dishes that can be used in breakfast and other meals too.

  1. Polish Potato Bread
  2. Polish Crepes
  3. Placki Ziemniaczane (Polish Potato Pancakes)
  4. Polish Farmer’s Cheese Toast
  5. Breakfast Skillet with Kielbasa and Eggs
  6. Polish Plum Butter
  7. Polish Rye Bread
  8. Smoked Trout Dip
  9. Polish Easter Bread (Bobka)
  10. Polish Donuts

Most Popular & Traditional Polish Foods List

The following food names are some of the traditional recipes of Poland cuisine that poles never miss to include in their meals irrespective of breakfast, lunch, or dinner.

  • Oscypek & Bryndza Cheeses
  • Wild Mushroos
  • Zurek / żurek
  • Sernik
  • Kisiel
  • Kotlet Mielony,
  • Placki Ziemniaczane – Potato Pancakes
  • Golabki / Gołąbki – Cabbage Rolls

FAQs On Traditional Polish Breakfast Foods To Try In 2023

1. What is a typical breakfast in Poland?

Poland people mostly start their day with eggs and meat for breakfast in the form of sandwiches along with other side dishes like quark cheese mixed with radishes, kefir, etc.

2. What food is famous in Poland?

Poland is famous for its traditional Polish foods like Gulasz, Bigos, Pyzy & Knedle, Kotlet Schabowy, and many more.

3. What is Poland’s national drink?

The national beverage of Poland is Vodka. Also, it is famous for distilling it from potatoes.

Final Thoughts

We hope the shared foods called Polish breakfast recipes of Poland foods can be served to your relatives and loved ones every morning and make them happy. Every religion in Poland wishes to incorporate their traditional Polish foods for breakfast and energize fully. If you have doubts as a beginner to cook any of the Polish breakfast foods then save and refer to this page for quick solutions.

Meanwhile, you may also share this guide with other people and help them to learn and make some easy Polish recipes for breakfast. Want to ask or look for more recipes from other European countries then Canfoodgobad.com will be your one-stop destination for any food-related articles. Haven’t found any of the important and required stuff about the food then reach us via the comment section below.

Quick and Easy Basic Scones Recipe With Plain Flour – How To Make A Basic Scone Perfectly?

Basic Scones Recipe: Scones are utterly delectable desserts. And yet, the Britishers devised an ingenious way to enjoy these treats without eating a meal! That’s right. Traditionally, scones are served with tea and coffee.

And it isn’t difficult to imagine why. These British snacks are easy to prepare, delicious to eat, and not too heavy on your stomach! The perfect accompaniment to your evening cuppa!

Therefore, we had no choice but to share our favorite basic scones recipe with our readers! Now, below, you will find a comprehensive recipe for scones. So what are you waiting for? Let’s get started!

Basic Scones Recipe

How to Prepare the Basic Scones Recipe?

Our mouths are watering by now since we have kickstarted a conversation about scones. But, we will not let out gluttony get in the way of your recipe. So, below, you will find a comprehensive list of ingredients that you will need to source before you can actually bake your batch of scones.

Once you have gone through that, you will find detailed instructions on exactly what you need to do in order to bake scones. Let’s get to it.

Ingredients That You Will Need to Bake Basic Scones Recipe

Remember that the finished scones’ flavor will reflect the quality of every ingredient you use, so don’t skimp. Don’t sacrifice quality for the sake of quantity.

What You’ll Need Is Listed Below:

  • Two cups of flour, any kind
  • One-half of a teaspoon of salt
  • A half cup of full-fat cream
  • Unsalted butter, half a cup
  • Sugar, granulated, 1/3 cup
  • 1.5 medium-sized eggs
  • Powdered sugar, one tablespoon
  • Extract vanilla, one teaspoon

Keep the unsalted butter in the fridge until ready to use. And cut it up into little pieces. This specificity will become clear to you very soon! Let’s go on to putting together those scrumptious scones using these components.

Do Check: Vegan Scone Recipes

Instructions for Preparing the Perfect Basic Scones Recipe

Learn how to make the best basic scones ever!

  • To begin, prepare a baking sheet by lining it with parchment paper and placing it in a preheated 400F/200C oven.
  • While the oven preheats, gather the dry ingredients and whisk them together in a large bowl. Combine them well so that there is no variation in texture.
  • Then, transfer the cold, unsalted butter that has been chopped into the basin. Use a pastry cutter or your fingertips to cut in the butter until the texture resembles coarse crumbs.
  • Now, in another dish, beat together the egg, the heavy cream, and the vanilla extract.
  • When you’re ready to combine the dry and wet components, do so gradually while mixing the two together. The final dough should have mild stickiness and dryness.
  • The dough must now be shaped. Gently shape the dough into a ball on a floured surface. Make a thick circle with a diameter of approximately an inch and cut it into 8 or 12 equal wedges.
  • Arrange the scones in a single layer on the prepared baking sheet and, if you want, brush the tops with additional heavy cream or a beaten egg. To ensure they are well done, bake them for another 15-18 minutes in the oven.
  • Take the scones out of the oven after a few minutes and let them cool on a wire rack. Your scrumptious scones will now be ready to eat.

How Long Does It Take To Prepare Basic Scones?

Typically, baking the basic scones recipe should take you about 45 minutes, even if you start from scratch. This could vary a little bit but that will largely depend on how proficient you are in the kitchen.

You should consider about 20 minutes to 25 minutes as far as preparing the dough is concerned. That is followed by about 5 minutes for properly kneading the dough. And finally, you need to leave it for about 15 to 20 minutes in your oven while they bake.

Also Refer: Baked Egg Recipes

How to Store Fully Baked Basic Scones?

Once your delicious scones have cooled to the accurate temperature, you may put them away to enjoy at a later time. Here’s what you have to do to keep them functioning at peak efficiency. Make sure your scones have cooled fully before putting them away. Believe me, keeping in too much heat can cause them to get soggy and mushy on the inside.

Put the scones in an airtight container or resealable bag to keep them from drying out. Make sure your bag or container is large enough to hold all of the scones without crushing any of them. If you want to stack your scones, you may avoid sticky disasters by placing a sheet of parchment or wax paper in between each one.

Look for a dry and cold space, such as a closet or pantry. Storing your cherished scones in the fridge will hasten their drying out. Freezing is an excellent choice if you want to further increase their storage life.

Put the scones in a sealed freezer bag after being individually wrapped in plastic wrap or aluminum foil. Label the bag with the date and its contents to avoid any unpleasant encounters in the future. Scones can be stored in the freezer for up to three months if the bag is frozen solid.

Take them out of the freezer one hour before you want to eat them again so you can enjoy their deliciousness at room temperature. After defrosting, you can choose to reheat them in the oven or microwave or enjoy them at room temperature.

How to Serve Basic Scones?

Scones are delicious and if you want to enjoy a tried and tested method of serving scones, you can always go with jam or whipped cream. However, we believe that every once in a while, you need an innovative twist to your regular scones. So, here are some of the most mouth-watering ways you can serve this baked snack!

  • Scones are a versatile base that may be topped with a wide variety of sweet and savory ingredients. Depending on the tastes of your visitors, you may top them with everything from jam to honey to whipped cream to fresh berries to cheese to smoked salmon or even bacon jam.
  • To create little sandwiches, split your scones in half across the width. For a sweet snack, try filling them with Nutella and banana slices instead of bananas.
  • A scone cake is made by stacking scones and filling them with whipped cream and fresh fruit.
  • Scone pudding is a treat similar to a bread pudding that may be made using scone scraps. Cube the scones and combine them in a bowl with the custard, the berries, and the sugar. Put it in the oven and let it stay there until the custard has set and the top is browned.
  • You may make ice cream sandwiches by slicing your scones in half and placing a dollop of ice cream in the center.
  • Cut your scones into little cubes and skewer them with chunks of fruit or cubes of cheese for quick and simple appetizers.
  • Create a show-stopping dessert in minutes by layering crumbled scones, whipped cream, fruit, and a drizzle of honey or chocolate sauce in a trifle dish.

Scones may be served in innumerable different ways, so don’t be afraid to experiment! Using your creativity, even a standard recipe for scones may be elevated to the level of a crowd-pleasing masterpiece.

Related Posts: 

Tips & Tricks to Bake Basic Scones Recipe

Make sure to follow some of the below tips and witness the great changes while baking your basic scones. Let’s do this:

  • Here’s a tip for avoiding overbaking while yet achieving perfectly crisp scones on the outside. Mix some egg whites and milk together right before you put the scones in the oven. Then, use a pastry brush to lightly coat the unbaked scones with this mixture. This little modification will provide the desired crunch!
  • Keeping your dough at a cool room temperature is essential. The dough’s texture and texture won’t be as light and airy if it becomes too warm while you’re working with it.
  • Allow your dough to rest for a while before putting it in the oven so that it can relax and rise properly. This is the secret to light and airy scones every time!
  • Using cold components in your scone recipe is also a good idea. Be sure to refrigerate your milk, butter, and eggs until it’s time to add them to the dough. This simple hack will help your scones rise and improve their texture, making for a delightfully airy snack.
  • If you give these individualized methods a go, you’ll be blown away by how much better your scones turn out. Prepare to be wowed by batch after batch of delicious scones.

FAQs On Basic Scones Recipe Using Plain Flour

1. Can you freeze fully baked-scones?

Yes, Scones that have already been baked can be frozen to extend their freshness. Put them in a vacuum-sealed, airtight container or bag and store them in the freezer.

2. How to prevent your scones from becoming dry and crumbly?

Stop overworking with the dough of scones because it turns out dry and crumbly. Make sure your scones don’t spend too much time in the oven.

3. Can you freeze scone dough?

Yes, scone dough can be frozen in the same manner that cooked scones can be frozen. You may freeze these for later use if you split them into scone-sized portions and store them in airtight containers.

Final Words

At last, you got to know the making of a basic scone. We hope the shared details about basic scones recipe preparation and cooking can master you completely. So enjoy having the basic scone together with a cup of tea.

Do keep in mind that the secret to making scones with a nice texture is to knead the dough well without overworking it. All the best with your baking! For more such recipes and food ideas, reach out to us by visiting our main site @canfoodgobad.com

25+ Delicious and Easy Toddler-Friendly Breakfast Options

Easy Breakfast Recipes: Breakfast is the most important meal of the day and must be consumed in a bulk amount to not only give you a boost of nutrition to kickstart your day but also keep you full enough so that you don’t overeat during the rest of the day’s meals.

However, we often don’t get enough time to spend on lavish cooking in the morning. Hence, easy breakfast foods come in handy because they not only fulfill the main agenda of having a sumptuous breakfast but also save time.

In this article, we are going to discuss plenty of such amazingly simple, pocket-friendly, quick breakfast recipes that you definitely can’t miss. So now, come let’s quickly dive into the article and unlock these beautiful recipes.

Easy Breakfast Recipes

Top 10 Easy Breakfast Recipes That Are Terrific In Taste

From doctors to dieticians, everybody suggests having a healthy surplus breakfast right at the start of the morning is helpful to keep grinding the rest of the day. So, try checking out the numerous healthy yet easy recipes for breakfast and make you full every day. Here is the list that reveals the data on Quick & Easy Breakfast Ideas To Start Your Day:

  1. Rise and Shine Parfaits
  2. Waffle Sandwich
  3. Cornflake Coated Crispy Bacon
  4. Rhubarb Compote with Yoghurt and Almonds
  5. Brunch Style Portobello Mushrooms
  6. Banana Oatmeal Pancakes
  7. Spinach Mushroom Scrambled Eggs
  8. Strawberry Lemonade Smoothie
  9. Feta Scrambled Eggs Wrap
  10. Overnight Cherry Almond Oatmeal

Rise and Shine Parfaits

This particular recipe is an amazing option to start your day with a smile as it is super easy to make and just requires fruit granola and yogurt Parfaits. This recipe is one of the most favorite fresh fruit dishes that is specifically going to grab the attention of the young members of the family.

For this recipe, you will require fat-free vanilla yogurt, freshly chopped blackberries, chopped medium peaches, and granola without raisins or cereals. This dish is low in carbs and high in protein, sodium, good cholesterol, and fiber.

Waffle Sandwich

Sandwiches are definitely one of the most common breakfast dishes in every household because they are not only easy and mess-free but also get ready in just a couple of minutes. This particular waffle sandwich recipe goes amazingly paired with some crisp juicy apples to give a perfect balance of good nutrients.

The sweetness and crunch of the waffles in this sandwich can be adjusted with the addition of some nuts and waffles. Additionally, you will require Canadian Bacon, chopped onions, shredded reduced-fat cheddar cheese, eggs, low-fat multigrain waffles as well as some sliced tomatoes before you bake things to perfection. Diabetic people can replace the ingredients with starch and medium-fat meat.

Do Check:

Cornflake Coated Crispy Bacon

This breakfast recipe is yet another super kid-friendly dish that generally goes amazing during special occasions like Christmas and birthday parties. This recipe is high in protein and requires a simple set of ingredients including ketchup, evaporated milk, bacon strips, crushed cornflakes, a dash of pepper, and the star of the show Worcestershire sauce. For more bacon breakfast recipes, click on this link.

Rhubarb Compote with Yoghurt and Almonds

This particular dish is a very old and savory breakfast dish that is tart but sometimes might come with a bit of extra sugar to add some extra sweetness. This recipe is vegan and requires some simple ingredients namely, chopped, fresh rhubarb, honey for sweetness, reduced-fat plain Greek yogurt, sugar, some sliced and toasted almonds along with walnuts to finish it up with an extra delicious topping.

Brunch Style Portobello Mushrooms

Portobellos are well known for their stuffability and provision of getting combined with a huge variety of versatile and rich ingredients that are definitely going to rock not only your breakfast or brunch but your dinner as well.

This recipe is a super stylish one and requires frozen, creamed, and thawed spinach, large portobello mushrooms with stems removed, shredded gouda cheese, crumbled cooked bacon, eggs, and a finishing touch with a generous garnishing of salt and pepper.

Must Read: 

Banana Oatmeal Pancakes

This particular breakfast dish has less sodium per serving as compared to other pancakes that are made from mixes. Sodium is further decreased by adding a mix of banana oats and walnuts making it an amazing breakfast option, especially for people having high pressure.

This recipe is sweet enough in itself and hence just needs a quick garnishing of little confectioners sugar without the need to add any syrup to it. To go on with this recipe you will need 2 cups of complete whole wheat pancake mix along with some oats, finely chopped bananas, and some final garnishing of chopped walnuts, nutmeg & cinnamon to give a boost of flavors.

Spinach Mushroom Scrambled Eggs

This particular recipe is an amazing mushroom and egg dish that is low in carbs and fat but high in protein and good cholesterol. If you are diabetic you can exchange the above ingredients with some medium-fat meat as well instead of eggs.

To go on you will need some egg whites, unsweetened butter, thinly sliced mushrooms, shredded provolone cheese, chopped baby spinach along with a final garnishing of pepper and salt.

Strawberry Lemonade Smoothie

This particular breakfast smoothie dish is super refreshing and is a perfect blend of sweet and citrus flavors that not only work best as a breakfast but also as a midday snack. This recipe is especially good for all those people who literally don’t have time to do anything in the morning and find it convenient to dunk some quick ingredients in the blender, to have it in one go and rush to the office.

This recipe requires only 4 ingredients, namely, frozen, unsweetened strawberries, lemonade, vanilla extract, and yogurt and you are good to go in just about 5 minutes.

Related Posts:

Feta Scrambled Eggs Wrap

This dish is one of the most famous Greek dish ideas that are not only healthy but super tasty and easy to make. This recipe gets ready in just about 15 minutes and requires a simple set of ingredients including crumbled feta cheese, southwestern-style egg substitute, whole wheat tortillas, and some sliced and chopped pepperoncini.

Overnight Cherry Almond Oatmeal

Oatmeal is yet another one of the most common breakfast dish ideas that are amazing for vegans as well as fitness freaks out there. This recipe is super simple, healthy, warm, and satisfying that just needs a few ingredients to be slow-cooked overnight.

The ingredients that you will need to pair here are vanilla almond milk, brown sugar, dried cherries, steel-cut oats, and a final garnishing of ground cinnamon and brown sugar.

List Of Easy Breakfast Recipes For Kids

If you have a household full of little sweethearts, then the following easy breakfast recipes are definitely going to save up your time and also pose to be your kid’s absolute favorites. Let’s see the recipes now:

  • Banana Coconut Oats Porridge
  • Multigrain Millet Porridge
  • Vegetable Rava Upma
  • Lentil Spinach Pancakes
  • Instant Ragi Carrot Dosa
  • Maize Flakes Upma
  • Egg Omelette Bites
  • Broccoli Cheese Fingers
  • Savoury Oats Veggie Pancake
  • Avocado Blueberry Muffins
  • Lemon Blueberry Muffins

Collection Of Easy Breakfast Recipes For Weight Loss

Weight Loss and maintaining health is the best agenda people focus on from all age groups. For this, you need good, gluten-free, low-fat, high-protein, and high-fiber recipes to boost your metabolism. Let’s see some amazing breakfast recipes in this category:

  • Chickpea Flour Pancakes
  • Leek and Scrambled Tofu Sabzi
  • Cardamom & peach quinoa porridge
  • Avocado & black bean eggs
  • Instant Khaman Dhokla
  • Ragi Rava Idli
  • Low-Calorie Quinoa Oat Dosa
  • Fig, nut & seed bread with ricotta & fruit
  • Scrambled eggs with basil, spinach & tomatoes
  • High protein Sabudana Khichdi
  • High Protein Moong Masoor Dal

List Of Easy Vegan Breakfast Recipes With Simple Ingredients

Vegans! We do have a list of amazing and easy breakfast recipe ideas for you too. Comes let’s have a look at them together:

  • Carrot Walnut Muffins
  • Baked Cinnamon French Toast Sticks
  • Sprouted Ragi Malt
  • Blueberry Baked Oatmeal
  • Coconut Mango Muffins
  • Whole Wheat Vegan Waffles
  • Strawberry Banana Smoothie
  • Sweet Potato and Sage Breakfast Biscuits
  • Tofu Scramble with Salsa
  • Carrot Quinoa Breakfast Cookies

FAQs on 5 Minutes Breakfast Recipes Indian

1. What are good ideas for breakfast?

Some great ideas for breakfast are burrata toast, coconut granola, Ricotta, Walnut and Strawberry Crostini, Soft Scrambled Eggs, Spring Avocado Toast, Vegetable Frittatas, French Toast, etc.

2. What can a 12-year-old make for breakfast?

Some amazing breakfast recipes that are toddler friendly as well are baked oatmeal, blueberry muffins, peanut butter banana cookies, strawberry ricotta toast, egg muffins, ham frittatas, breakfast strata, hard-boiled egg pops, chocolate protein pancakes, orange creamsicle smoothie, etc.

3. What are the best breakfast foods?

The best breakfast foods that are definitely a must-try are bread, eggs, veggies, smoothies, soups, splits, yogurt parfaits, tofu, toasts, etc.

4. What are 3 healthy breakfast options?

The 3 best and most healthy breakfast options to try at the earliest are definitely going to be oatmeal, cottage cheese, and smoothies from various fruits and vegetables.

5. What is a balanced breakfast?

A balanced breakfast is a surplus dish to kickstart your day that has the perfect balance of fibers, carbohydrates, proteins, vitamins, and minerals combining items from various food groups like fruits, veggies, dairy, and cereals.

Closing Thoughts

Wrapping everything up, Breakfast is the most essential meal of your day. So those were the easiest breakfast recipes that you must definitely try for your family. These recipes are best especially for people who are working or homemakers who have plenty of chores to do at home. We hope you found this article super helpful and interesting at the same time, so make sure you stay tuned with us for more such writeups.

Sun Dried Tomato Chicken Florentine Pasta Recipe – Weeknight Comfort Food

Chicken Florentine Pasta: Craving for Italian dish with chicken at dinner time? This wonderful delicious creamy chicken florentine past is the perfect option to satisfy your tummy. One of the simple and easy-to-make dinner recipes is this combination of tender chicken and pasta with spinach sauce. Grab the complete recipe details from this guide and have fun cooking and tasting the weeknight chicken florentine pasta recipe.

In this article, we have explained fully about the healthy chicken florentine pasta right from what it is to how it is prepared with storage and making tips. If you are a fitness freak then you can try this ultimate sun-dried tomato chicken florentine paste recipe.

Chicken Florentine Pasta

What Is Chicken Florentine Pasta?

We think you may wondering about one fancy word after looking at the recipe name! Am I Correct? If yes, then we must start with the same query, right? Here, the word ‘Florentine’ means serving foods with spinach. Now, you can guess 80% of recipes like what it includes majorly.

The chicken florentine pasta is an italian creamy sauce pasta that works best to light up the mood on weeknights. This dish is easy-to-make and healthy too. So, don’t miss trying out this comfort dish at your lazy weekday dinner and enjoy the restaurant-style pasta at home in a healthy way.

Related Posts: 

Ingredients You Need For Baked Chicken Florentine Pasta Dish

This nostalgic buffet-favorite chicken florentine recipe preparation can go so smoothly and easily if you arrange all the needed ingredients together before stepping into the process. So check the list below:

Chicken: Chicken is the top ingredient to make this recipe. Use the thin sliced boneless or skinless chicken breasts or turkey breasts in this recipe.
Spinach: Greens are the best source of iron and vitamins and spinach in this pasta sauce adds nutritional value.
Pasta: The next top ingredient is Pasta of any type, but fettuccine is the perfect choice for this recipe.
Parmesan Cheese: Any kind of cheese can work best to achieve creamy pasta. Some other options to try in place of parmesan cheese are Asiago cheese, Pecorino Romano cheese, or Romano cheese.
Seasoning: To season the chicken, you need Catanzaro herbs or Italian seasonings along with some black pepper and salt.
Sun-dried Tomatoes: You can enhance the taste of the sauce, adding some color and acidity to the dish.
Heavy Cream: It is used to create a creamy sauce and elevate the texture and taste of the recipe. Also, chicken and paste will be coated with the sauce using heavy cream. You can substitute heavy cream with whole milk or half-and-half.

There are some of the major ingredients consist in the chicken florentine pasta dish. The other ingredients which are used in sauce and pasta are listed below with the quantities. Let’s see that:

  • One pound fettuccine
  • Six (4-ounce) thin boneless, skinless chicken breasts, cut in half
  • One teaspoon of Catanzaro herbs or Italian seasoning
  • Half teaspoon salt
  • One-fourth teaspoon of black pepper
  • Three tablespoons of unsalted butter
  • Half cup diced onion
  • Two tablespoons chopped sun-dried tomatoes
  • Two Cloves of minced garlic
  • One-fourth cup of dry white wine (such as Pinot Grigio)
  • One cup shaved Parmesan cheese, plus more for garnish
  • Three-fourth cup of heavy cream
  • Half cup 1% milk
  • One (8-ounce) package of fresh spinach

How To Make Creamy Chicken Florentine Pasta Recipe? (Directions)

  1. The first step is to boil the pasta and keep it aside. To do that, take a large bowl and add water and salt to a pinch or as per the requirement.
  2. Bring the water to a boil and later add the picked pasta (means fettuccine) to cook for 80% or about 8-9 minutes.
  3. Meanwhile, take a plate or bowl to season the chicken breasts. For seasoning, take Cantanzaro herbs, black pepper, and salt in instructed amounts and season both sides of the chicken pieces.
  4. Now, it’s time to cook the chicken so for that take a skillet and keep it at medium-high heat and place the chicken breasts. Cook each side till it turns golden, if done keep it aside and maintain the warm temperature.
  5. In the same skillet, add the other ingredients like sun-dried tomatoes, onions. garlic. Cook them and use a spatula to stir.
  6. It’s time to add the wine and reduce it to half. Later, add parmesan cheese, and cream to make the thick sauce.
  7. Give a good stir to start thickening, if required any liquid consistency add extra milk or cream and mix well.
  8. Take a colander and keep the spinach at the bottom and then start straining the cooked pasta using the same colander to wilt the spinach in the hot pasta water.
  9. Drain the water thoroughly and add both of them into the skillet along with the cooked chicken and gently combine all the ingredients.
  10. Cook all of them for 1-2 minutes in the sauce to absorb all the flavors and mix well into the sauce.
  11. Finally, switch off the heat and serve delicious creamy sauce chicken florentine pasta in a serving bowl and cheese or other addons if required.

Also Read: Chicken Recipes for Thanksgiving

Nutrition Facts Of Chicken Florentine Pasta Bowl

Here is the estimated Nutrition Information per serving of chicken florentine pasta:

  • Calories: 3507
  • Protein: 206 g
  • Fiber: 16 g
  • Fat: 164 g
  • Vitamin D: 2 mcg
  • Saturated fat: 87 g
  • Trans fat: 0 g
  • Calcium: 1790 mg
  • Cholesterol: 796 mg
  • Sodium: 3645 mg
  • Potassium: 3411 mg
  • Carbohydrates: 267 g
  • Sugar: 24 g
  • Iron: 10 mg

Note: The above nutritional facts details are not accurate as this was assumed based on the given ingredients and procedure.

Tips & Hints To Prepare The Best Pasta With Chicken & Spinach

Heading to learn some tips for making the best pasta is very important before cooking any recipe. So, here we have provided some of the tricks that help you all to make the perfect and delicious chicken florentine pasta:

  • Add a tsp of oil while cooking pasta to avoid sticking together and cook perfectly.
  • Ensure to cook the pasta not too soft but tender and keep stirring for making the pasta move around.
  • Always use ingredients organic and keep yourself and others healthy.
  • Using organic and free-range ingredients like chicken, spinach, etc. enhances the taste of the dish.
  • This recipe can also be prepared with vegetarian substitutions like vegetable stock, mushrooms, and others which helps to serve vegetarian guests.
  • For storage and serving tips and suggestions keep on reading this guide and gather the needed information about this fantastic recipe.

Points To Remember While Storing & Reheating Florentine Pasta With Chicken

One of the important modules in this guide is this learning about How to store and reheat the chicken florentine pasta recipe. Excited to know new things then jump into it & serve it with good quality every time.

  • If you want to receive great comments from your loved ones or guests after taking a bite of chicken florentine pasta then serving the dish right away from the pan is the perfect solution.
  • When you left with a large batch of florentine pasta with chicken then you can store the leftover fresh for upto 2-4 days in the refrigerator.
  • While preserving the pasta use the airtight container for the best quality.
  • If you want to serve the leftover then reheating it is a must. To do that, you can use any of the tools like a microwave or oven, or saucepan.
  • Transfer the chicken florentine pasta to heat it, add some milk or cream to it wait till nicely warms. At last, you can serve them to yourself or your guests.
  • Caution is to not freeze this pasta recipe because there is a chance to curdle the cheese when defrosted.

What To Serve With Florentine Chicken Pasta?

You can serve the delicious Florentine pasta with chicken as a dinner meal on weekdays for that comfort & rich feel. If you want to serve other foods along with this recipe then trying Dinner rolls, Bruschetta, or Garlic bread make your day.

Are you looking for a light side dish with chicken florentine pasta? A fresh salad that makes you cool in summer is the best option to complete the meal on weeknights. It balances the healthy and unhealthy foods and prevents damaging your diet too.

Do Check: Passover Chicken Recipes

List of Additional Chicken and Pasta Dinner Recipes

Want to try some other yummiest chicken pasta recipes at dinner time then check the list given below:

  • Chicken Tequila Fettuccine
  • Thai Curry Chicken Noodles
  • Parmesan Chicken Caprese
  • Chicken Paprikash with Pasta
  • Cajun Chicken Pasta
  • Chipotle Chicken Cream Sauce Pasta
  • Chicken Bellagio with Creamy Sauce Pasta

FAQs On Instant Pot Chicken Florentine Pasta Pioneer Woman

1. What makes a florentine?

A dish with spinach and mornay sauce makes a florentine. This term originated from classic French cuisine which relates to typical recipes included with cooked spinach and a protein-based element called mornay sauce.

2. What is the origin of chicken Florentine?

The birth of chicken florentine was back in 1500s France when a Florentine aristocrat called Catherine de Medici knotted a tie with a French prince.

3. Where can I get detailed instructions to cook Florentine Pasta with Chicken? 

You can get detailed instructions or directions to cook chicken creamy sauce florentine pasta from our page with additional information too.

Final Thoughts

We think that the information shared on the chicken florentine pasta recipe is enough to try for your next dinner meal and make your weeknight so satisfying. You can surely serve this dish in any of your family gatherings or at weekday events as it is healthy and attractive too.

Wanted to learn the rest of the unique chicken recipes for dinner? Make sure to visit our site @Canfoodgobad.com and check the dinner category for numerous varieties of dinner recipes.