Does Vanilla Extract Go Bad? – Unveiling the Shelf Life & How To Store It?

Can Vanilla Extract Go Bad?: In most baking recipes we use vanilla extract which gives extraordinary flavor to your recipes. But most of us won’t rely on baking recipes regularly, right?

So, if you suddenly see a bottle of extract in your cupboard, you may get these questions in your mind, can vanilla extract go bad? How long does this vanilla extract last? Does vanilla extract expire? If you are the one who goes into this dilemma, then you have come to the right place.

Vanilla extract was first introduced in 1874 in Indonesia, natural extract is produced from vanilla beans. These beans are percolated in a solution of water and ethyl alcohol. Some of these extracts have sugar and caramel color.

The main difference you can see between pure and imitation vanilla extract is the smell. Pure vanilla extract distinctively has a complex flavor compared to artificial vanilla extract. It will be more flavorful even if you add a few drops of it.

Here, in this article, we are going to look at how to know if it is bad and also learn how to store vanilla extract to maximize freshness and more. Just check out this article and get answers to all your questions. Let’s get started!!

Can Vanilla Extract Go Bad

Can Vanilla Extract Go Bad? How To Tell That It Is Bad?

No. Vanilla extract will not spoil or go bad as meat or dairy goes it might be artificial or pure. We will have the expiry for the imitation extract by reading this you might be thinking, don’t we have any labels for pure extracts? It will also have the labels of best by date as we need to follow the law but it will last indefinite years. Once your imitation extract has completed its time it doesn’t mean that it will spoil. But it will lose its quality as well as its flavor and aroma which is useless.

If you want to know if your vanilla extract is bad, the most common signs you can see are that vanilla extract will have an unpleasant smell, changes the flavor of the liquid, and also changes the consistency of the liquid. Check it twice, as the flavors of pure and imitation vanilla extract are different.

Also Check: 

Can Vanilla Extract Go Bad

How Long Does Vanilla Extract Last?

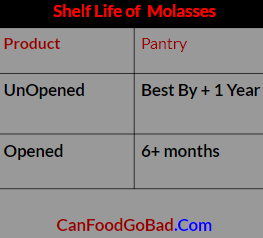
As we said above, pure extract can be used for long years while artificial extract has a limited shelf life might be between 2-4 years. The shelf life of extract depends on various factors like best by date, preparation method, and how it was stored.

CanFoodGoBad.Com
TypesStorage Life
Pure vanilla extractIndefinitely
Imitation vanilla extractBest-by + about 2 years

If you got the extract for less price maybe you have bought the imitation vanilla extract, as the pure vanilla extract is a bit costly.

Shelf Life of Vanilla Extract

How to Store Vanilla Extract?

The vanilla extract should always be stored very appropriately. What do you mean appropriate? How to store? Let us discuss this below and it is not much difficult. By doing this you can store vanilla extract for a long time.

Store at Room Temperature

Vanilla extract is better stored in a moderately cool or slightly lower room temperature of between 60- 80F. As we told you that you need to keep it cool, do not keep it in the refrigerator. Freezing will likely decrease imitation vanilla extract quality. The most common places to store this extract are pantries, cabinets, and kitchen cupboards.

Keep it in Dark Bottle

Mostly, vanilla extracts come in a dark-colored bottle like black or brown. To avoid the heat and sunlight, they do this. If your original packing is in the light-colored bottle then it is better to change it into the dark-colored bottle.

Close the Lid Tightly.

It is also one of the most important tips to remember. when the extract is not in use, you need to close the lid tightly. Because, if it is exposed to air and light extract may speed up alcohols evaporation and gives harmful bacteria a good chance to enter it. Extract always should be in an air-tight container and use the glass jar even if you brought it in a plastic bottle.

Avoid Moisture

One more enemy for this vanilla extract is moisture along with heat and light. Do not hold it with wet hands, even if you introduce a single drop of water into it is not at all a good thing. It should be away from the dishwasher, stove, and refrigerator as molds might attack the undersides of bottle or jar lids.

Transfer it to Small Bottles

If you have bought a large bottle of vanilla extract to use in your home, transferring them into smaller bottles will avoid opening the bottle too many times.

Related Articles:

FAQs on Can Vanilla Extract Go Bad?

1. Will I get sick if I use expired vanilla extract?

No, it is unlikely that you will get sick by using expired vanilla extract, but if you know it is gone bad it is better not to consume it.

2. Can we freeze vanilla extract in a refrigerator?

No, you should not freeze the vanilla extract in a refrigerator. By freezing it the quality of it will be reduced.

3. What is the best imitation vanilla extract?

One of the best imitation vanilla extracts is baker’s imitation vanilla flavor, and McCormick’s Culinary Clear Imitation Vanilla Extract.

Key Takeaways

Hope that the information provided on can vanilla extract go bad? is useful for you. By this, you may get some clarity on how to use, how to store, and how to know that extract is bad. Check the best by date before buying the extract and also make sure it is a pure extract. Still, if you have any doubts you can comment to us in the comment section below. For more interesting articles, stay tuned to our site canitgobad.com

Does Molasses Go Bad? – How to Store Molasses for a Long Shelf Life?

Can Molasses Go Bad?: Everyone loves to taste sweetness in food as well as in life. Molasses is one of the sweetest items that are available in your kitchen but we use it often. If you like to bake some goodies like gingersnaps then it is a key item that substitutes brown sugar.

But do you know if can molasses go bad? if you store it for a long time. If you do not have an idea about it, study our article to know it today itself. Molasses is a thick syrup that has been derived from sugar cane juice and adds a distinct flavor to your baking recipes.

It will be sweet as it contains magnesium and potassium. Even it can be added to sauces and marinades too. We have done some digging and we found out the shelf life of molasses that most of us do not know, and we have provided you with some Molasses storage tips too.

Sounds Interesting right? so, start reading the article completely without skipping anything to acquire lots of information about molasses.

Can Molasses Go Bad

Can Molasses Go Bad?

Yes, molasses can go bad if you do not store it properly. Because when you leave the molasses open for a long period of time then you will get some bacteria, and fungi and grow mold. And also if the molasses is stored for a long time the taste will change and the quality will be decreased.

Signs that Molasses Has Gone Bad

Molasses is one of the hardest products to determine its age. The easiest way to figure out that molasses is spoiled is to think about when you bought it. And here are some signs to know that your molasses is not good.

Give it a good Sniff

When you smell the molasses and if you find the smell is bad like sour, funny or it is not in actual smell then avoid using it.

Look for Mold

When you opened a jar and if you find any mold on the surface then kindly discard the bottle.

Taste the Syrup

If you do not have any symptoms that we discussed above, then taste the syrup, if it is different from the normal taste then get rid of it.

Types of Molasses

In molasses, we have 3 types. Knowing the differences between types will help when you are trying to figure out whether molasses have gone bad or not while tasting. Because different molasses will be in different tastes.

  • Light Molasses
  • Blackstrap Molasses
  • Dark Molasses

Light Molasses: This is made from the first boiling of the cane or beet juice. And it tastes sweetest, mildest in flavor and the color of it will be lightest. Light molasses is also called Barbados, first, mild, sweet. It will be used commonly in baking, which helps to make cookies softer and bread crustier. And it can also be used in sauces and marinades.

Dark Molasses: This is made from the second boiling of the cane juice. And looks thicker and darker. It tastes less sweet and stronger in flavor than light molasses. This will be used mainly to replace the light molasses in baking bread as it gives distinct color and flavor. The other names for these molasses are full, robust, and second.

Blackstrap Molasses: This type of molasses is made from the third and final boiling of the cane juice. And this is the healthiest molasses compared to the other two molasses as it retains the most vitamins and minerals. And it will be very thick and dark in color. It will taste less sweet and pronounced bitter flavor. This will be used in recipes and mainly for savory dishes blackstrap will be good.

Types of Molasses

Can You Freeze Molasses?

Yes, you can freeze the molasses but while you are freezing it you need to change it to a freezer-safe container with an airtight lid. When you pour it into the container do not fill up to the top and write the storage date before sticking it in the freezer. As this molasses will last for a decade in the pantry you do not need to keep it in the refrigerator to extend the shelf life. Freezing the molasses can easily get mold growth.

How Long Does Molasses Last?

If you see the shelf life of molasses it will last for 1 to 4 years and you can use it for up to four months after expiry if it is unopened. Here we are going to look into the table to know the shelf life of opened and unopened molasses clearly.

ProductPantry
Molasses (Unopened)Best By + 1 year
Molasses (Opened)6+ months

Check out the below image and share it with your friends, so that it will help them, not to fall sick.

Shelf life of molasses

Can Molasses Go Bad

How to Store Molasses?

Molasses is made nothing from pure sugarcane juice, produced while refining sugar. To keep molasses long-lasting here we are going to provide you with some storage tips. Let us look into them below.

  • The best way to store molasses is to keep it at room temperature in the pantry or in the refrigerator.
  • When you store it in the pantry keep it in a cool, dry place.
  • Keep the product away from heat and humidity.
  • By keeping the product in the refrigerator the viscosity of the product will thicken.
  • As cold molasses is hard to pour, immerse it in warm water before use.

Related Articles:

FAQs on Can Molasses Go Bad?

1. What is molasses?

Molasses is a sweetener made from pure sugar cane juice, produced while refining sugar. It is a good source of magnesium and potassium.

2. Is expired molasses ok to use?

Yes, you can use molasses after expiry as it is a food it will not have expiry but it should be stored properly.

3. Can molasses ferment?

Molasses is very easy to incorporate into fermentation processes and represents a stable and predictable substrate to store and handle.

Key Upshots

We hope that the information we have given on whether can molasses go bad? is useful for you. Molasses will be long-lasting but using them before the best date is the better option not to change their taste of it. Still, if you have any other products to know you can comment to us in the comment section, and we will try to add them. To avail, of interesting updates stay tuned to our site.

Does Barbecue Sauce Go Bad? Yes, Here’s Why Store-bought & Homemade BBQ Sauce Go Bad

Can Barbecue Sauce Go Bad: When you have arranged a BBQ party in your backyard, and at the very last moment, if you see that the barbecue sauce that is having is past the expiry date, it will be the biggest mood spoiler.

The next thing that comes into your mind is can barbecue sauce go bad, is it safe to use even if it is expired? How long does it last? and you may start searching about this on the internet. And finally, you may have landed on our page, Right?

Don’t worry, we have answers to all your questions and also you can know the Barbecue Sauce shelf life, storage, and many more. Keep on scrolling to know everything about the BBQ sauce!!

Can Barbecue Sauce Go Bad

How Long Does BBQ Sauce Last?

Normally, when you buy the BBQ sauce in the store it will come with the “best before date”. And any BBQ sauce will have a shelf life of 1 to 2 years. But the shelf life will change to 4 months once it is opened. By storing it properly the sauce will last long. And one more thing is, every store-bought barbecue sauce comes with preservatives added to it, so they will not go bad that easily. Check out the shelf life of BBQ sauce, with the periods.

 TypesPantryFridge
BBQ Sauce (unopened)Best by + 6 months Not recommended
BBQ Sauce (opened) 1 – 4 weeks4 months
Homemade BBQ Sauce7 – 14 days Not recommended

Shelf life of BBQ sauce

Note: The period that we are providing above is for best quality only. Sometimes, the sauce may stand out more than the period we have shown, but there will not be good quality.

Does BBQ Sauce Go Bad?

Yes, the barbecue will go bad as it cannot last forever, but it will not go bad that easily. Because the BBQ sauce contains a lot of preservatives like vinegar, sugar, and lemon juice that makes the sauce quite resistant. All you need to do is you need to store it properly, if it is unopened you can keep it at room temperature in the pantry, but once it is opened it is better to place it in the refrigerator. So that it can keep the quality for months. If you keep the BBQ sauce for a year by opening it, it will go bad and have mold.

Also Check:

Signs of Spoilage

Without proper storage, BBQ sauce will go bad easily, and when you take out BBQ sauce after a long time from your pantry or refrigerator, if you see any of the signs that are given below, then throw that BBQ sauce immediately.

Change in Color

When you open the sauce if you see any change in the color of BBQ sauce, then it is a sign that the sauce has gone bad. If it comes closer to expiry it will have a deeper, darker hue. It might happen due to oxidation.

Separation of Liquid

It is another sign to know that the BBQ sauce has gone bad. Normally, when you keep it in the refrigerator without using you may see separation and if it comes closer to the expiry date then also you may see separation. Anyways, when you see the separation of liquid, give a shake to mix the ingredients. It if mixes up everything uses it, or throws it.

Change in Texture

Barbecue sauce should be smooth, spreadable, and vicious. But if you see that the BBQ sauce is slimy, thick, or clumpy. Then it’s time to throw the sauce in the trash.

Pungent Smell

If you cannot see any of the visual signs then it’s time to check the smell of the BBQ sauce if it is opened after a long time. Basically, barbecue sauce will get a smell like little tart, sweet or smoky. But if you get pungent, bad, or downright gag-inducing then toss it off.

Mold Growth

When you open the bottle of Barbecue sauce if you see any mold in the sauce bottle, as it is not healthy to eat, you just discard it.

Related Articles:

Can Barbecue Sauce Go Bad

How To Store BBQ Sauce

To ensure that your BBQ sauce keeps as long as possible, make sure that you are storing it correctly. If you do not know how to store the BBQ sauce properly, follow the guidelines that are given below.

  • If you have the unopened bottle of barbeque, place the bottle in a cool, dry, and dark place.
  • And keep that bottle away from the heat elements and avoid any potential oxidation or contaminant exposure.
  • If you have any homemade BBQ sauce, put it in an air-tight container and place it in the refrigerator.
  • Even if it is store-bought BBQ sauce, once after opening it should be stored in the refrigerator.
  • Always store the bottle upside down which helps to retain the quality for longer.
  • After every use of BBQ sauce, keep the cap clean and dry, and keep the lid tightly.
  • Use clean and dry spoons to take out the sauce.

Does BBQ Sauce Need To Be Refrigerated?

Yes, you need to store the BBQ sauce in the refrigerator once after opening. If it is made at home then also we will keep the BBQ sauce in the refrigerator. If it is an unopened bottle there is no need of keeping it in the refrigerator you can keep it in the pantry. If you leave the BBQ sauce at room temperature, it will go bad within a few weeks. If you think that the opened bottle of barbecue sauce will complete within a week, then you can leave it in the pantry or kitchen cabinet.

FAQs on Can BBQ Sauce Go Bad

1. Can I use unopened expired barbecue sauce?

The unopened bottle of BBQ sauce was stored in the pantry for more than one year. Even if it is past the expiry date if you have not seen any spoilage signs, it is still safe to use it.

2. Why didn’t the vinegar save the sauce?

If you have purchased the BBQ sauce from the best brand,  as we have many ingredients and preservatives, once after opening everything will degrade over time. Oxidation causes the breakdown of objects like fungus and mold growth. So, vinegar can saves the sauce once it is oxidized.

3. Can Old BBQ Sauce Go Bad?

Yes, but it will go bad if there is no proper storage. Even if it is old you can consume it until it doesn’t have any visual signs.

In a Nutshell

Hope that the information that was provided regarding can BBQ sauce go bad is useful for you. Still, if you have any doubts about this article you can comment to us in the comment section. To avoid the wastage of sauce, store the sauce properly and enjoy long-serving BBQ sauce. Stay connected to our site for more interesting articles.

Best Chocolate Chip Pancakes – How To Make Chocolate Chip Pancakes With Tips

Chocolate Chip Pancakes: Are you looking for something to gift your foodie brother? Do you wanna gift him mouth-watering chocolate chip pancakes? He’ll be very amazed by these fluffy and delicious pancakes made with everyone’s favorite chocolate chips. Usually, while working hunger strikes abruptly that time these so yummy chocolate chip pancakes can fulfill your wish! Ingredients used to prepare these pancakes are not only helpful to taste them better but also add some nutritious value to this recipe.

We’ll be presenting a brief synopsis of healthy “Chocolate chip pancakes” recipes in this article, and you’ll be getting familiar with its proper preservation and some topmost tips to enhance its texture and quality.

Chocolate Chip Pancakes

How To Make Chocolate Chip Pancakes?

Before initiating the procedure to prepare the most delectable and delicious thing for kids to old-age people i.e. the chocolate chip pancakes, you need to thoroughly understand the outline of steps required for preparing these Pancakes. We’ll be acknowledging the simple and easy-to-understand procedure to prepare these pancakes.

Firstly, it’s crucial to understand the required ingredients for the preparation of chocolate chip pancakes, we’re presenting the list of ingredients which are given as follows:

  • All-purpose flour or cake flour: 2 cups
  • 2 teaspoons of baking powder
  • 1/2 teaspoon of salt
  • Fined Granulated sugar: 2 to 3 tablespoons
  • Almond milk or fat-based milk around 2 cups
  • Large whole eggs: 2-3
  • Unsalted butter, melted and iced to 1/4 cup
  • Vanilla extract: 1 teaspoon as optional
  • Semi-sweet chocolate chips: 1 cup (prefer mini choco chips)

We hope most of the items are present in your kitchen itself and you don’t need to go and buy these, if not available bring them. It’s time to explore the directions to make these yummy choco-chips pancakes using the steps given below:

  • Let’s separate the dry ingredients in a large bowl and add 2 cups of all-purpose flour, 2 teaspoons of baking powder, 1/2 teaspoon of salt, and 2 tablespoons of fine granulated sugar.
  • In a separate mixing bowl, combine the wet ingredients such as 1/2 cup of milk, 2 large eggs, 1/4 cup of melted and cooled unsalted butter, and 1 teaspoon of vanilla extract. If needed!
  • Pour the wet ingredients into the large bowl of dry ingredients and whisk all of the batter until it’s mixed thoroughly. To avoid producing difficult pancakes, don’t overmix the batter.
  • One cup of semi-sweet mini chocolate chips should be added to the batter.
  • Scoop the batter onto the skillet or griddle using a 1/4 cup measuring cup. You should be able to fit 2-3 pancakes at a time, depending on the size of your pan.
  • Cook the pancakes until bubbles form on the surface and the edges start to look dry, then flip and cook until the other side is golden brown. It should take between two and three minutes on each side.
  • Once the chocolate chip pancakes are golden brown and crispy, transfer them to a plate and cover them with a piece of aluminum foil to keep them warm while you cook the remaining pancakes.
  • We’ll be briefing you about the list of toppings to make these chocolate chip pancakes look fancy and intensify their taste while serving.

Read More:

Tips To Follow For Making Best Chocolate Chip Pancake

While preparing these yummy and fluffy chocolate chip pancakes it’s very vital to perform everything with precautions and a systematic approach. There are some parameters you need to keep in mind while undergoing the baking procedure.

Let’s now look into some of the top tips and tricks to remember while preparing chocolate chip pancakes.

  • As chocolate chips are the game changer in these pancakes, make sure you use mini pieces of choco-chips instead of using regular kinds of choco-chips.
  • To replace the granulated sugar, there’s another way to add natural sweeteners such as mashed banana and honey, it’ll directly decrease the calorie content in these pancakes.
  • For gifting, presentation is vital hence, you can make various kinds of shapes using cookie cutters to make heart-shaped, spade-shaped, etc.
  • You can also use cake flour or pastry flour to prepare these Chocolate chip pancakes for an extra fluffy and soft texture instead of using regular all-purpose flour.

How To Preserve Easy Chocolate Chip Pancakes?

As far as the preservation of chocolate chip pancakes is concerned it’s very vital to look into the correct procedure to do so, we’ll be discussing the various possibilities to preserve these delicious chocolate chip pancakes.

Let’s go through the brief explanation of how to preserve chocolate chip pancakes without any notable change in taste:

  • Let’s say you’re busy lately and you want to prepare these yummy chocolate chip pancakes for your mother who’s coming in 3 days. You can prepare these pancakes in advance and then refrigerate them.
  • Make sure you keep these pancakes in a secure place with a systematic coating of cling film on each Chocolate Chip Pancake to protect it from freezer burn.
  • Similarly, for occasions, festivals, and birthdays you can freeze them for a longer duration too! These Chocolate chip pancakes can be easily frozen for almost 8-9 weeks without any drastic change in their quality and taste.
  • For freezing, it is important to keep all those wrapped chocolate chip pancakes in freezer-safe containers or ziplock plastic bags and allocate the low-traffic place in the freezer for 8-9 weeks.
  • Once the special occasion arrives, just defrost the bag of chocolate chip pancakes in the refrigerator or at room temperature for a whole night.
  • For bringing back their hotness and freshness, reheat the frozen chocolate chip pancakes using a microwave, oven, or cooking pan as per the availability and your preference.

Topping Ideas For Best Chocolate Chip Pancakes

For gifting, the chocolate chip pancakes must be very elegant in look and delicious as well, for the toppings on these pancakes are very crucial which can make its look as well as taste both beyond amazing!

We’re providing a list of amazing and easy toppings which you can drizzle on these Chocolate chip pancakes:

  • Whipped cream: Pancakes always taste better with heavy whipped cream and enhance their delicious texture that looks very fancy and feels so yummy in the mouth.
  • Chocolate syrup: To intensify the more Chocolatey flavor in the pancakes, pour this syrup on the top of each pancake. It’ll make these pancakes look great and taste extra great!!
  • Flavored ice cream: Imagine adding your favorite flavored ice cream on top of these chocolate chip pancakes which will give you the extremely delicious feel of having dessert for breakfast or brunch.
  • Honey and maple syrup: Natural honey contains low calories as compared to granulated sugar, then why can’t we lessen the sugar content and top the pancakes with natural honey to make it sweeter.
  • Pistachio: If you’re a very big fan of pistachio in most of the recipes you consume, then these pancakes can also give the twist of pistachio flavor and make the pancakes more flavorful as well as yummy!

Also, Check:

FAQs on Fluffy Chocolate Chip Pancakes

1. Can we use dark chocolate instead of Chocolate chips?

Yes, if there’s no availability of choco-chips in your kitchen you can even make little pieces of dark chocolate or you can use grated dark chocolate in the batter of chocolate chip pancakes. Make sure the dark chocolate is fresh enough to enhance the chocolaty flavor of the pancakes.

2. Can you refreeze chocolate chip pancakes more often?

No, it’s not advised to refreeze the frozen chocolate chip pancakes as you’ll reheat the pancakes and it’ll come in contact with surrounding unhygienic air which will indirectly result in a change in the texture of the pancakes. Hence, it’s not advisable to refreeze Chocolate chip pancakes.

3. Which is the best chocolate chip brand for pancakes?

Well, there are a variety of brands producing chocolate chips but as per our findings and reviewed by experts it’s suggested to use “Sugar Rush mini chocolate chip” which is easily available on all e-commerce platforms.

4. How much caffeine do Chocolate Chips contain?

Generally, one medium jar of chocolate chips contributes around 34 mg of caffeine which is the best content ratio to get the benefits of the same. Along with this, it also has 0.5 g of protein.

Key Takeaways

It has been shown that the idea of gifting such amazing and delicious “Chocolate Chip Pancakes” will definitely please the mood of your loved ones and not only make them feel delighted but also fulfill their hunger to eat something very special made by you. We’ve tried to cover all the parameters required to know about chocolate chip pancakes and provided a simple and engaging blog post on the same.

We would be grateful to know how you feel about this blog and write a review on the same. Stay tuned for more such acknowledging articles on recipes like Paleo Pumpkin Pancakes.

High-Protein Muffins For Your Kids – Know How To Prepare & Make Delicious Muffins

High-Protein Muffins: Having something delicious in your office cupboard makes you feel very interesting while working, right? In a world full of junk snacks, it’s very challenging to find a snack that is nutritious as well as delicious in taste that you can enjoy in hand. Whenever you crave something yummy, you end up eating that usual pizza, burger, sandwich, and very high-calorie pastries by ordering it online and it wastes your money as well as time, but there’s no need to fear when we’re here now!

In the following blog post, we’ll be looking at the numerous benefits of this energy boosting and the power of protein in these “High-protein muffins”. Just make sure you read this blog without skipping any points. So, let’s have a quick tour of these classic and mouth-watering muffins without making you bored while reading….

High Protein Mufins

How To Prepare Low-Calorie High-Protein Muffins?

So, let’s not waste your time without providing you with the actual information about high-protein muffins. Below we have provided you with the ingredients that you need and the step-by-step process to make these high-protein muffins. Check them out carefully and enjoy.

Ingredients Needed For High Protein Muffins

To make these high-protein muffins, we need some basic ingredients in our kitchen which are dried as well as wet ones that are listed as follows:

  • Almond Flour of around one and a half cups
  • One teaspoon of Baking powder
  • ¼ cup of Protein powder of your favorite flavor
  • ⅓ cup of coconut flour
  • Add Peanut butter or an alternative as per your requirement.
  • 1 teaspoon vanilla extract (optional)
  • ½ cup Unsweetened applesauce
  • Chocolate chips as per your need.
  • ½ teaspoon salt
  • 2-3 Eggs

Step By Step Instructions To Make High Protein Muffins

What are we doing now? Once all the basic ingredients are with us, we’ll take a step towards its preparation with a systematic approach….

  • For avoiding confusion in the dry and wet ingredients we need to pour all the dry components into the medium bowl and keep it on the countertop.
  • On the other hand, mix the wet components which are listed above and let it set for some time in the medium bowl as well.
  • As the next step, prepare a batter of high-protein muffins in a large vessel or bowl, by pouring the wet ingredients into the medium bowl or dry ingredients and then whisking it together and letting the batter sit for a few minutes.
  • It’s recommended to keep the batter of high-protein for some time till it rises well. It’s time to bake the high-protein muffins hot and delicious and preheat the oven to the desired temperature somewhere around 350 degrees Fahrenheit.
  • In the muffins tin spoon the batter as per your requirement and make sure it does not exceed two-thirds of the muffin cup.
  • In the end, keep it baking for around 15 minutes and check whether it’s baked or not by inserting the toothpick in the center of the high protein muffin and if it comes out clean or with the stained batter.
  • Once you observe the fluffy and hot baked high-protein muffins, then withdraw the muffin tin from the oven and keep the muffins to adjust their warmth to the surroundings on the countertop.
  • Serve your favorite nutritious high-protein muffins as a breakfast, brunch, or evening snack with the topmost toppings provided in the following part of this blog post.

How To Preserve Gluten-Free High-Protein Muffins

Whenever special occasions are around the corner everybody wants to prepare something in advance so that they’ll not face any hectic situation during festivals. But, it’s also very vital to understand the situation of food we’re going to preserve and also consider some changes occurring in it. Similarly, we’re here to explain to you the preservation approach of high-protein muffins that can be preserved very well and used when required.

Here’s the step-by-step guide for preserving these muffins:

  • Generally, we’ll be discussing the three different ways according to the situation. Firstly, if you want to consume these high-protein muffins within the next 5-6 days then it’s recommended to pack them with a secure coating of aluminum foil or cling film and keep it in the refrigerator for a week.
  • On the other hand, if you have any plans in upcoming months about a trip or any kind of occasion and you want to preserve these muffins till that time then the only one-stop solution is to freeze these high-protein muffins.
  • For gifting these high-protein muffins within only one or two days of preparing, you can simply pack them by sealing them and keep them at room temperature for up to 2-3 days.

Read More:

How Do I Freeze High-Protein Muffins

As we mentioned above, the magic of freezing high-protein muffins can sustain their shelf life for a longer period of time without noticing significant changes. These simple techniques can freeze high-protein muffins easily without any hindrance just have a quick look at the points given as follows:

  • After baking, the muffins are fluffy and extremely hot. So, it’s vital to keep them cooling on the countertop for some time and when the muffins are cooled completely then wrap them in clean foil or aluminum foil.
  • Allocate the wrapped muffins to the freezer at a secure place that has very low moments and no air exposure.
  • Usually, It can sustain its freshness for three months easily but it’s quite important to consume them as early as possible to minimize the health hazardous causes.
  • Just be sure that before bringing it into use on special occasions, don’t forget to defrost the muffins properly or heat them.
  • To bring back the hot and fluffy texture of high-protein, reheat muffins at a sufficient temperature for 1–2 minutes.

Best Topping Ideas for Healthy High-Protein Muffins

We’ll not be providing you the unnecessary toppings which will waste your time as well as effort, it’s time to save time and enjoy something extremely delectable in a short time span. Here’s the list and specialty of four amazing toppings to enjoy over the hot high-protein muffins.

Nuts or seeds: More crunchy taste makes everything taste a hundred times better similarly, in these high-protein muffins we’ve various nuts and seeds such as almonds, walnuts, pecans, and sunflower seeds can add up nutritional value to these high-protein muffins along with the crunch as well.

Fruits: The addition of fruit slices and tiny pieces can make the high-protein muffins absolutely yummy with their naturally sweet taste, you got plenty of options to try on these muffins such as kiwi slices, blueberries, pineapple chunks, frozen blueberries, and many of your favorite fruits.

Nut butter: Your preferred flavor of nut butter such as cashew butter, peanut butter, almond butter, and others can give a delicious treat on these nutritious high-protein muffins, and along with that you can also have drizzled maple syrup on the top of these muffins!!

Chocolate chips: Mini choco chips over these high-protein muffins are all it takes to memorize your childhood nostalgia of enjoying chocolate on everything.

Tips To Follow For Making Vegan High-Protein Muffins

Whenever we try to do any sort of work, useful tips always act as a game changers and boost things to make anything very perfect!! Similarly, here we’ll be briefing about the topmost tips which has to be followed while preparing high-protein muffins:

  • The most vital thing is to not overbake the high-protein muffin batter just because it’ll spoil the taste of the muffins. Additionally, you can also add cheese as a topping for creaminess.
  • You can add extra protein powder as a topping if you want to boost the level of protein in your muffins. It’ll indirectly add the protein components along with the tasty flavor in the muffins.
  • Ensure that you’ve filled the muffin cups evenly without overflowing them, it’ll prevent wastage as well as bake the muffins evenly.
  • It’s advisable that before initiating the procedure to freeze the muffins, you need to keep the muffins on the countertop to allow them to adjust their temperature with the pantry environment.

Some Other High Protein Muffins For Breakfast To Try

Well, it’s time to look into the numerous kinds of high-protein muffins with the specialty and taste of each kind. Sometimes it makes you feel bored of trying that same type of muffin. We’ll be telling you about other delicious, nutritious, and healthy muffins which will blast the bomb of taste and various special flavors.

Have a quick look at some more ideas for high-protein muffins:

  • Greek yogurt muffins
  • Chia seeds muffins
  • Peanut butter muffins
  • Protein powder muffins
  • Cheese muffins
  • Almond flour muffins
  • Muffins like doughnuts
  • Pudding
  • Cookies
  • High-protein muffins with chocolate
  • Banana oats muffins
  • Pumpkin protein blender muffins

Also, Check:

FAQs on High Protein Muffins Without Protein Powder

1. Can you prepare high-protein muffins using bananas and oats?

Yes, absolutely the addition of fully riped mashed bananas can lessen the sugar content in these muffins and also adds up protein-rich components along with the oats magic.

2. Can we consume high-protein muffins for body-building?

Yes, the high-protein muffins can be consumed for bodybuilding as it has protein powder in them which acts as a bonus in the meal, and also has an ample amount of carbs in one muffin which is around 20g.

3. Is it advisable to use shop-bought muffin mix for preparing these high-protein muffins?

Yes, at some point you can simply use these shop-bought muffin mixes provided that you’ve added more components to it to make it a protein-rich and nutritious snack to enjoy!!

4. Can you add the savory toppings of eggs and bacon to these high-protein muffins?

Yes, every individual has different choices for increasing the protein content in high-protein muffins, so adding eggs and bacon on top of them may give a great taste!

Key Takeaways

We hope that you’ve got a solution to what you’ve been looking for on the Internet. It’s time to stick with our webpage for more precise and captivating recipe blog posts. Don’t forget to post a review after preparing these “High-protein muffins” in your kitchen and share your thoughts on how this blog post has helped you to understand the complicated steps very precisely and easily.

Also, don’t forget to visit our website for more factual and concise blog posts like sugar-free muffins and many more.


Paula Deens French Toast – How To Make Paula Deens French Toast With Tips

Paula Deens French Toast: Every once in a while, you come across a recipe that simply leaves you feeling sad that you didn’t come across it earlier. And Paula Deens’ French toast is one such recipe that fits that bill perfectly. Before we get to the actual recipe, you should know what it is about.

So, Paula Deen is a household name in the USA who gained popularity thanks to her southern-style culinary art. This recipe for baked French toast casserole is a Paula Deen original. And this blog is your comprehensive guide to cooking this particular recipe to perfection! So, without further ado, let’s dig in!

Paula Deens French Toast

How to Cook Paula Deen’s French Toast?

Paula Deen cooks conventional French toast in an extremely unconventional manner. Despite that, her French toast recipe results in something inexplicably sumptuous. Therefore, it only makes sense that you want to try your hand at it too!

Below, we have laid out comprehensive instructions on what you need to cook this French toast recipe and how you need to go about it. This particular recipe also includes a praline topping and raspberry syrup. We have included instructions on how you can make them too!

Ingredients That You Will Need to Cook Paula Deen’s French Toast

The list of ingredients for this recipe is actually a tad bit extensive. But I would suggest that you try and include all the ingredients mentioned below in your preparation of the recipe. Trust me you will not regret it.

  • 8 large whole eggs
  • 1 cup of milk
  • 2 cups of half and half
  • 1 cup of preserved raspberries
  • 1 cup of chopped pecans
  • 1 cup of light brown sugar
  • 2 tablespoons of sugar
  • 1 tablespoon of vanilla essence
  • 1 teaspoon of ground cinnamon
  • 1 teaspoon of ground nutmeg
  • 1 loaf of French Bread
  • Half a pound of butter
  • 2 tablespoons of light corn syrup
  • 2 tablespoons of raspberry liquor
  • 3 tablespoons of water
  • Salt to taste

Now, remember that in any and every recipe, you can always make do with alternative ingredients. Even though your version of the recipe will not taste exactly like the original, it will still taste good if you follow the cooking instructions properly. And the same logic applies to the above list of ingredients. For instance, if you cannot find French Bread, you can use Brioche instead!

Instructions to Cook Paula Deen’s French Toast

Now that you know what you need in order to cook this recipe, here is what you need to do with those ingredients!

  • The first thing you need to do is take out a large mixing bowl. In that bowl, crack all of the 8 eggs. While beating the eggs, gradually add the milk, half and half, half a teaspoon of cinnamon, and ground nutmeg each. Now you can either whisk it using a regular whisk or you can use an electric beater. Whichever is more accessible for you would work. Make sure that you whisk the entire mixture in a way that has no lumps and that it is uniform in texture throughout.
  • Next, take your loaf of bread and slice it up. Try to keep the slices at least an inch thick for the best taste.
  • Once you have sliced up your load of bread, you need to take your casserole dish and butter it up. Use a large amount of butter to make sure that every bit of the dish’s surface is covered in butter.
  • Neatly arrange the bread slices in the casserole with each slice overlapping the other. Once you have arranged the bread slices in this manner, you will now pour the egg mixture into the casserole. Try to make sure that the mixture permeates every slice of bread equally. You can use a spoon to facilitate that!
  • After having soaked the bread slices in the egg mixture, simply use aluminum foil to cover up the entire casserole dish. Place this covered casserole dish in your refrigerator and leave it there overnight.
  • When you wake up in the morning, make sure you begin your day by preheating the oven to 350 degrees Fahrenheit.
  • Leave your oven while it preheats. In the meantime, you can get started on the praline topping. For this, all you need to do is mix the brown sugar, pecans, light corn syrup, and the leftover cinnamon and nutmeg with butter in a mixing bowl. Again, the goal is to create a mixture that has no lumps and is uniform in texture throughout.
  • Take your praline topping and lay it on the bread and egg mixture generously. Now, place the entire casserole dish in your preheated oven for about 45 minutes!
  • Wait for the casserole to develop a golden color on its surface before you remove it from your oven!

Read More:

Instructions to Prepare the Raspberry Syrup

Preparing the raspberry syrup is extremely simple. Add the preserved raspberry along with water and the raspberry liquor into a saucepan and mix it all together with the stove set to medium heat. After a few minutes, when the mixture has developed a syrup-like consistency, take it off the flame and serve it with the French toast casserole!

What is the Total Preparation Time to Make the Paula Deen French Toast?

Technically speaking, since you need to place the soaked bread in your refrigerator overnight, we can say that it will take you about 9 hours to finally prepare the French toast casserole. That includes 8 hours of overnight soaking in the refrigerator and 45 minutes for baking the casserole the following morning, and of course, 15 minutes for all the ancillary preparation!

Even though that sounds like an awful lot of time for one dish, we assure you that you will not regret the wait. The end result is simply so mouth-wateringly delicious that you will not mind another 9-hour stretch to enjoy it again!

How to Store a Fully Prepared Paula Deen French Toast?

Storing the fully prepared Paula Deen French Toast recipe that we have discussed in this blog is slightly complex. Nonetheless, it is something that you can do to prevent wasting it! So, here’s how you can keep a cooked Paula Deen French toast casserole fresh for later use:

First, give the dish plenty of time to cool down. To prevent food poisoning, it should not be left out at room temperature for more than 2 hours. After the casserole has cooled completely, wrap the casserole firmly in plastic or foil.

Now, put the casserole in the fridge, covered. The dish can be kept for three to four days in the fridge. Whenever you want to finally eat it, simply reheat it. You can pop the dish in your oven after the oven has been preheated to 350 degrees Fahrenheit and leave it in there for about half an hour. Bear in mind that reheating a completely cooked French toast casserole might result in dryness or a loss of texture, so keep that in mind. If your casserole has lost its moisture and flavor, you may add more maple syrup or a dab of whipped cream before serving.

How to Serve Paula Deen’s French Toast Casserole?

We do not want to ruin Paula Deen’s French Toast casserole by giving you multiple methods of serving them. Therefore, we will stick to the judgment of this recipe’s creator. She advocates for a very simple method of serving this dish, and that is with some raspberry syrup on the side. The sweet tanginess of the berries goes extremely well with the praline topping and the delicious texture of the casserole.

However, if you still want to explore different ways of serving this recipe, here are a few innovative ways that enticed our taste buds!

  • Make a fruit compote using your favorite fruits and serve it with the casserole. This might be a mixture of berries, sliced bananas, or peaches. The compote may be used as a topping for the casserole, or it can be served on the side.
  • Make it savory by adding meat such as sausage, bacon, or sliced ham to the egg mixture for a savory casserole. To boost the flavor even more, put some cheese on top before baking.
  • Don’t just stick with white bread; experiment with various varieties, such as cinnamon raisin, brioche, or challah. The casserole will have better flavor and texture as a result of this.
  • Cut the cooked dish into sticks and serve with maple syrup or a fruit sauce for dipping to make French toast sticks.
  • Make a proper dessert out of the French toast casserole. To do that, simply top the casserole with vanilla ice cream and a drizzle of caramel or chocolate syrup before serving.
  • Include a crunchy topping by scattering chopped nuts (such as pecans or walnuts) over the top of the dish before baking.

Tips and Tricks to Prepare the Paula Deen’s French Toast

Finally, you are all but prepared to bake the most delicious French toast recipe by Paula Deen. Therefore, here are a few tips and tricks to help you get the most out of this recipe.

  • The type of bread you use will have a great impact on how good your final preparation tastes. Therefore, make sure you use a fairly sturdy type of bread. The reason is that we want bread that will not turn into a soggy mess after soaking up the egg mixture. Moreover, make sure that you allow the bread to soak up the mixture for a minimum of 30 minutes.
  • We find that rushing through the process just the night before you actually want to eat it can be stressful and lead to mistakes. Therefore, we would advise you to prepare the recipe beforehand and then simply remove and bake it in your preheated oven when you are ready to eat or serve it!
  • Use a deep dish to soak the bread in the egg mixture. This will allow the bread to sit deep in the dish and soak up the egg mixture from all directions. Moreover, it becomes easier to serve the final preparation without spilling or wasting any of it!

Also, Check:

FAQs About Paula Deen’s French Toast Recipe

1. What are the different types of bread you can use to prepare this recipe?

Paula Deen herself uses French bread. However, as we mentioned, most sturdy bread would do the trick just as well. Therefore, you can experiment with brioche, challah, and stale croissants to prepare this recipe!

2. Can you use dairy alternative milk in this recipe?

Yes, you can use dairy-free alternatives to prepare this recipe. Almond milk and soy milk are great options if you want to eat this dish without worrying about the effects of lactose on your digestive system!

3. Can you freeze the fully prepared casserole?

Yes, you can freeze the fully prepared casserole for about 3 months. Whenever you are finally ready to eat it, simply thaw it in your refrigerator overnight and then bake it in your oven for about 20 minutes!

Final Outcomes

Paula Deen’s French Toast is truly a marvelous recipe. And this blog answers all of your questions about it. You can even experiment with different types of topping apart from the praline topping we have included in this blog! Happy baking!

Follow our website for other interesting recipes like Cracker Barrel French Toast and many more,  and bookmark our site for the latest updates.

10+ Best & Healthy Christmas Muffins Recipes To Try Out For Jolly Christmas

Christmas Muffins:  Nothing can feel better than the wafts of freshly baked muffins piercing your senses as you get out of bed on a bright Christmas morning. That said, which Christmas muffin recipe should you bake? Now, the way we see it, you do not have to limit yourself to only the conventional recipe for Christmas muffins. The rule of thumb when you want to bake for special holidays is “the more, the merrier.”

While this certainly does apply to your guests, this also holds true for the different varieties of Christmas muffins that you can bake. So, in this blog, we will be telling you about a few of the most delicious Christmas muffin recipes that you can give a shot at! Let’s get right into a delicious frenzy and begin talking about these recipes!

Christmas Muffins

Easy Christmas Muffins You Can Bake for a Jolly Good Christmas!

Below, you will find a few of our favorite types of Christmas muffins. Now, some of these might be slightly tricky to get right. But we assure you that at the end of your baking endeavor when you smell the aroma of your hard work escaping your oven, you will realize that it was worth it!

Hot Cocoa Chocolate Chip Muffins

Gone are the days when you need to sit and blow on a cup of hot cocoa on your Christmas morning. With this recipe, we present an alternatively delicious muffin recipe that you can simply bite into on this festive day. The concept is rather simple. Instead of a hot cup of cocoa, you will enjoy a muffin that perfectly combines the essence of hot cocoa with a fluffy and chocolate-chips in a bite!

To bake these delicious muffins, you need to begin with your regular muffin batter. Now, the next step after having prepared your muffin batter is to add hot cocoa. Hot cocoa is similar to your regular cocoa powder, with the primary difference being that the cocoa is darker than regular cocoa.

Eggnog Muffins

Eggnog, are the beverage of choice on Christmas. So, why not infuse a muffin with eggnog? What is the worst that could happen? Well, we found out that this is possibly one of the best Christmas muffins you can enjoy. Warm eggnog-flavored fluffy muffins with, maybe, a dash of dark rum. It’s got our mouths watering already.

So, to start with, you prepare a regular muffin batter. Once your batter is ready, you add in eggnog, ground nutmeg, and, if you are up for it, a bit of dark rum. Now, let them bake in your preheated oven. At the end of the baking process, you will have warm muffins that overpower your senses with the nutmeg, eggnog, and rum floating about in your mouth! ENJOY!

Gingerbread Muffins

This is a modern take on a traditional Christmas dessert. These muffins are like a moist and fluffy variation of the popular gingerbread cookie. Think of a delicious muffin infused with the spicy-sweet aroma of ginger, cinnamon, and molasses.

They provide a warm embrace for your tongue. Gingerbread muffins are made by enhancing a standard muffin recipe with ginger, cinnamon, nutmeg, and molasses. All of us can agree that gingerbread isn’t quite the same without these seasonal additions. Simply the scent of these muffins baking in the oven will fill your home with a wonderful fragrance. Imagine your own personalized gingerbread mansion, except this one comes to life.

Pistachio Chai Muffins

The name, in itself, is intriguing, if not delicious, at the very least. That said, we can assure you that these muffins are heavenly to taste and rather simple to bake. And when you are done baking them, you will be able to enjoy the combined flavors of chai, pistachios, freshly ground cinnamon, ginger, cardamom, and cloves. Just the way masala chai is prepared in India!

As we mentioned, preparing this muffin recipe is a rather simple task. You begin by preparing your regular muffin batter. Except, you then add the spices like you would in masala chai. And voila! Your pistachio chai muffins are ready!

Pecan Pie Muffins

Pecans form the core ingredient in many desserts. And you know some of these desserts as pies, tarts, and whatnot. Now, what you may not realize is that pecans can also make great muffins. Now, we are putting forth a recipe that includes the deliciousness of a pecan pie in the form of a muffin.

In order to bake this particular recipe, you will also need a pecan pie. Once you have prepared that, or bought it, simply swirl it into your muffin batter. And now we bake. Make sure that you sprinkle some ground nutmeg and cinnamon into the mix. You are now ready with a fantastic pecan pie-flavoured alternative to pecan pie to enjoy on your Christmas morning!

Mincemeat Muffins

As unconventional as the name sounds, we promise you that the taste is conventionally lip-smacking. In fact, contrary to its name, a mincemeat muffin contains absolutely no meat. It is a rather fruity and spice-filled rendition of your regular muffin. Now, to bake it you will need to powder dry fruits and a few spices. And if you want to be particularly adventurous, you can even pour in a little brandy.

When you are actually going to enjoy these muffins, you should probably prepare a batch of mulled wine or English mint tea to go with it! Mincemeat muffins may not be the stuff of the main course but in our experience, we find that they often overpower any main course that you have prepared!

Banana Chocolate Chip Muffins

Now we find that banana chocolate chip muffins taste their best when you leave a slightly moist center. And when you can get this tricky recipe right, you will create unputdownable muffins that smell and taste like bananas. With every bite that you take, your taste of banana is pleasantly interrupted by a chocolate chip.

Cranberry Muffins

Fresh cranberries, are best to make excellent muffins. Imagine how good it must feel to eat fluffy muffins, every bite of which is bursting with fresh cranberries. The fact is that the natural acidic tanginess complements the muffin’s authentic sweetness perfectly.

And the best way to prepare cranberry muffins is simply to add fresh cranberries or even cranberry pulp to your batter mix. Make sure that the cranberry gets mixed uniformly in your muffin batter before you pop the Christmas treats into your oven!

Cinnamon Muffins

Christmas will always remain incomplete without the aroma of cinnamon floating about in the air. That probably makes these cinnamon muffins an excellent option if you feel like baking on Christmas Eve, or even Christmas Day! The recipe is extremely simple. In fact, you would prepare this exactly like you would prepare regular muffins.

Except, you would grind cinnamon into your batter. Make sure you do not use too much cinnamon in your muffins else you might taste slight bitterness in the final product! To round off your muffins perfectly, you can also add glazed caramel-cinnamon syrup on top of your muffins!

Sweet Potato Chocolate Muffins

Think of banana muffins. Except now, replace the banana pulp with sweet potatoes. And supplement the batter with chocolate chips. Now, make sure you mix it all together in a manner that ensures that you will find chocolate chips in every bite. If you choose your sweet potatoes wisely, you may not even need to add sugar separately! And, in any case, you will be adding chocolate flavoring.

Read More:

Best & Healthy Christmas Muffin Recipes For You to Try Out

We feel that you can never be too spoilt for choice when it comes to Christmas muffin recipes. Therefore, here are a few more muffin recipes that you can try out for your festive day if you have already gotten through the above list!

  • Peppermint chocolate muffins
  • Cranberry orange muffins
  • Apple cinnamon streusel muffins
  • Maple walnut muffins
  • Nutella swirl muffins
  • Carrot cake muffins
  • Almond Joy muffins
  • Caramel apple muffins
  • Nutmeg spice muffins

FAQs About Gluten-Free Christmas Muffins

1. Can you make vegan Christmas muffins?

Yes, you can make vegan Christmas muffins. Simply bake your muffins without using milk and instead use dairy-free alternatives and avoid using eggs altogether.

2. How to make your Christmas muffins moist at the center?

The simplest way to make your muffins moist at the center is to bake them shorter than you would generally bake your muffins. Further, you can add mashed bananas and other ingredients of a similar consistency to achieve that moistness at the center of your muffins!

3. How to ensure that your muffins bake uniformly?

In order to ensure that your muffins bake uniformly, you need to remember a couple of things. First, preheating your oven is non-negotiable. Further, you should make sure that you pour uniform amounts of batter into each muffin pan.

Final Outcomes

Now, at the end of this article, you have a bunch of new ways to improve your Christmases. The best bit is that these Christmas muffins are all nearly identical to make. The only differences arise in adding the different flavoring ingredients to your prepared muffin batter. Since you now have these recipes, go make merry! Happy baking!

For more interesting recipes like Cranberry Orange Muffins, check out the canfoodgobad.com website.

10+ Easy Breakfast Sides Ideas To Start Your Day Without Wasting Your Time

Breakfast sides: No matter what time you wake up in the morning we’ve got your appetite covered with an amazing range of breakfast sides. Because, whether or not you admit it, many times, your breakfast side will be the centerpiece of your attention at the breakfast table!

Now, we are here to help you make sure that you never run out of breakfast sides that deserve your undivided attention, sometimes even at the cost of the main dish! Therefore, we have, for you, a blog post about some of the best and easiest breakfast sides you can enjoy with your breakfast, every morning of the week! Awaken your palette with each and every savory morsel.

Breakfast Sides

Top 10 Breakfast Sides For a Crowd To Enjoy in the Morning

We have actually covered a variety of breakfast sides in this blog post. And while we can attest to how good they actually taste, we want you to promise to read on with an open mind. Some of these breakfast sides may seem unconventional, and yet, they will be worth the effort you undertake. So just dig in.

Bacon Strips

Let us start simple. Bacon strips. More specifically, fried bacon strips. A little bit of everything is what bacon brings to the table making it a perfect breakfast sidekick. This dish has a savory and slightly smoky flavor with the right amount of saltiness. Plus, it’s extra crispy. An ordinary morning becomes an exceptional feast with bacon, whether you like it thin and delicate or thick and meaty.

The conventional method is to serve it with a heap of light pancakes or nestled beside scrambled eggs. Yet, exploring unconventional ways is worth considering. Elevate the presentation by wrapping asparagus spears with this and scattering it over a lively salad. You can utilize it as a confidential component in your salty muffins.

Baked Apple Slices

Baked apple slices possess great versatility. Elevate your breakfast spread with them or simply relish them as a delightful treat.  With their burst of fruity goodness, the accompaniment of pancakes, waffles, or French toast becomes a fabulous addition to every bite.

What distinguishes it as the best part? Baking apple slices is extremely effortless. Mix cinnamon, sugar, and melted butter onto your apple slices. Surrender to the oven’s magical powers. Soon enough, you will receive juicy, caramelized pieces that are full of delightful natural sweetness.

Cinnamon Rolls

Cinnamon rolls are now a beloved breakfast side for many people worldwide. Adding a touch of sweetness and indulgence to the start of the day, they are frequently enjoyed with a cup of coffee or a glass of milk. These tiny twists of bliss are produced from a tender, yeasted mixture that is commonly made richer with ingredients like butter, sugar, and eggs. Numerous individuals take pleasure in these delightful treats.

Cinnamon rolls’ magic lies within their filling. Generously spreading a mixture of cinnamon and brown sugar over the dough creates an irresistible mix that smells amazing. A heavenly aroma fills the kitchen as the rolls bake and their filling caramelizes.

Banana Bread

We know for a fact that bananas are a great option for breakfast. You can actually choose to make it your breakfast’s primary food if you want. But, how many days can you go eating only bananas? There is a workaround to that. Banana bread. Banana bread is the perfect breakfast side for you if you want to enjoy the taste of bananas without getting bored of it!

The best part about it for you is that it is not particularly difficult to bake either. It will also help you get the most out of the ripening bananas in your fruit basket! Preparing banana bread involves mashing overripe bananas and combining them with common ingredients like flour, sugar, eggs, and butter. The delightful and widely loved pastry. The addition of optional ingredients like almonds, chocolate chips, cinnamon, or nutmeg can boost the flavor and texture of the bread. Some recipes may require these specific ingredients.

Overnight Oats

Overnight oats have, for some time now, been hailed as a superfood. Now, we don’t want to beat the same drum but overnight oats also make for a terrific breakfast side dish. By soaking overnight oats, you unlock their magic. After being left in the liquid overnight, the oats soften and absorb all the flavors. The texture becomes creamy and satisfying. It has elements of both a substantial gruel and a cool sweet.

They can be easily prepared and provide many flavor options that can please everyone’s taste buds. Combine rolled oats with a liquid such as milk or yogurt. Add your preferred sweeteners, fruits, nuts, or spices; the idea is straightforward. The refrigerator will work its magic overnight.

Also, Check:

Croissants

Croissants make for a tasty side dish to complement breakfast. Savor their natural buttery essence as is, or opt for a range of tasty fillings that open up endless possibilities.

The delicate, laminated dough creates layers in these pastry crescents.

To create those wonderful flaky layers, butter is folded into the dough repeatedly during this process. A pastry that is golden and airy which practically melts in your mouth is the outcome. From savory choices like ham and cheese to sweet options such as chocolate or almond paste, there is a croissant available to fulfill any desire.

Buttermilk Biscuits

Nothing can warm and comfort you on the breakfast table as those buttermilk biscuits can! Conjure up an image of a golden-brown pastry that nearly dissolves in your mouth. With a tender texture and tangy flavor, Buttermilk biscuits are a Southern classic.

Butter, flour, baking powder, and buttermilk are combined together to make them. The incorporation of buttermilk yields a delightful tanginess and is essential for the desired flakiness. A delightful breakfast side that will leave you craving more are buttermilk biscuits, whether enjoyed on their own or slathered with butter or gravy.

French Toast Sticks

French toast sticks are one of our favorites! They’re like small slices of breakfast nirvana that put a spring in your step first thing in the morning. Envision pieces of bread dipped in a sugary egg concoction and then baked till golden brown. While French toast itself can be your main breakfast item, sticks of French toast are a fun and tasty way to spice up an otherwise boring breakfast!

They can be dipped in syrup or your own toppings and are simple to handle. These scrumptious sticks, which are crisp on the outside and soft and custardy on the inside, are a great addition to any breakfast spread and are loved by both young and old. They are a delightfully indulgent way to kick off the day.

Hash Browns

Envision perfectly seasoned and cooked potato shreds. Hash Browns are a classic breakfast side that livens up any morning meal. Furthermore, they can be served in a variety of ways, such as golden, crispy patties or above a bed of shredded potatoes.

Hashbrowns add a satisfying crunch and a warming dose of potato deliciousness to any breakfast plate, whether it includes eggs, bacon, or sausages. They’re a tried-and-true breakfast staple that never fails to deliver on the promise of a satisfying meal.

Blueberry Muffins

Blueberry muffins are like small explosions of fruity delight that liven up the morning meal. Envision a fluffy muffin with bursts of flavor from ripe blueberries scattered throughout. Muffins filled with blueberries are a traditional breakfast side dish that adds a pleasant flavor to the day.

You’ll find plenty of juicy blueberries in the light and airy batter used to make these. The end result is a tasty snack that pairs well with hot beverages. Blueberry muffins are a cheery and tasty way to start the day, whether you make them yourself or buy them at your local bakery.

Read More:

Good & Easy Breakfast Sides For You to Try Out!

Breakfast should not be a boring meal. In fact, that is why we try to make sure that we whip up different varieties of preparations every day. And, having said that, you may want a few more options to choose from as far as your breakfast sides are concerned. Therefore, here is a list of a few more breakfast side recipes that you can take a gander with!

  • Breakfast sausages
  • Avocado toast
  • Fresh fruit salads
  • Bacon wrapped asparagus
  • Mini quiches
  • Breakfast potatoes

FAQs About Healthy Breakfast Sides

1. Are there gluten-free breakfast sides that you can enjoy?

Yes, there are gluten-free breakfast sides that you can enjoy. A few of them include fresh fruit salads, yogurt, eggs, berry smoothies, and baked items that use gluten-free alternatives to regular flour!

2. Which breakfast sides can you freeze for later use?

You can freeze breakfast sides like sausages, muffins, hash browns, and banana bread. All you need to do is make sure you wrap them as airtight as possible and put them in a freezer-safe vacuum-sealed container before you pop them in your freezer!

3. How can you make breakfast sides healthier to eat?

The simple way to make your breakfast sides healthier to eat is to use methods that remove the need for copious amounts of cooking oil. Air fryers are excellent tools to that end. Further, you can eliminate all-purpose flour and replace it with healthier alternatives!

Key Outcomes

And now that you are at the very end of this blog post, your breakfast will never be a boring meal again. Make sure you try every recipe at least once and, as we mentioned earlier, try to keep an open mind! Happy cooking!

For more interesting articles like breakfast cookies, checkout our official website.


7 Best Cuts of Beef For Pot Roast – Some of the Best Pot Roast Beef Recipes To Try

Best Cuts of Beef For Pot Roast: You may be thinking about the best cuts of beef for pot roast. But dont worry we are here to explain everything. Every one of us knows that tough meat beef is the best beef to cook for pot roast and many of us cook it but it does not taste well. Many of us do not know the secret that the taste of pot roast beef recipes lies in the way that the beef has been cut.

So, let us quickly look into the article and know the different varieties of best cuts of beef for pot roast. Along with some pot roast beef recipes that you need to try must as many of us enjoy pot roast in winter for dinner. Just let’s get started!!!

Best Cuts of Beef For Pot Roast

What is Pot Roast?

As you think pot roast is not a type of recipe it is just a method. Pot roast is a braised beef dish that is traditionally cooked in a Dutch oven or in different types of heavy pots, by adding all the vegetables, beef, and other ingredients to the pot, we will cook slowly. By this slow-cooking method, the flavors of all the ingredients will meld together and give you tender and juicy meat.

Choose the Best Cuts of Beef For Pot Roast

As pot roast is a classic comfort food that is perfect for a cozy dinner and if you are eagerly waiting to eat the best pot roast recipe then the best beef cut is necessary and it is essential. But most of us do not know about these cuts. Look into the below beef cuts that are good for pot roast.

  • Beef Chuck cut / Bolar Blade Roast
  • Brisket Cut
  • Bottom Round Roast / Rump Roast
  • Prime Rib Roast
  • Shunk
  • Top side
  • Rump Cap

Beef Chuck Cut / Bolar Blade Roast

When you think of pot roast then the best cut that you need to take from the supermarket is beef chuck roast or cut.  This is the cut taken from the shoulder of the cow and has a fantastic meaty flavor. Chuck Cut is a little fattier than the brisket or round and also has a richer taste but it is high in saturated fats.

We have many other names for the same cut that come from the same area are the chuck eye, Shoulder steak, cross rib roast, arm roast, and seven bone roast. Some people who sell the chuck roast will name as pot roast and sell it. Even the bolar blade roast is also part of the chunk.

Brisket Cut

A brisket cut is done at the chest in front of the short rib, or the lower front portion of the animal, and this cut is smoked or used in barbecue but it is also good for pot roast. As brisket cut needs more time to cook, smoking is prevalent and by slow cooking process brisket cut of beef turns into a tender and flavorful piece of meat.

As brisket cut is a large cut of meat, it will be good to cook when you think to feed a large crowd. This brisket cut is also known as beef brisket point half, flat cut, flat half brisket cut, point cut, and first cut brisket. If you want a lean cut go for beef brisket flat halt and if you want a fat cut go for the point cut.

Bottom Round Roast / Rump Roast

Round roast is another best cut but the lean cut of beef is often used for pot roast. This Round roast or rump roast is taken from the back or round primal of the cow. The other names that we have for this bottom round are rump roast or London broil or silver side.  This round roast is a boneless piece of beef that contains a high amount of collagen and connective tissue. But when you are cooking this cut as it is very lean it requires some fat to add to it.

Prime Rib Roast

Prime rib roast cut is the best cut for the pot roast as it is well-marbled and full of flavor and tenderness. When you are cooking this prime rib you need to remove the silver skin, so that the membrane will get shrink and the meat will curl up. Even you can add the herbs that you like while cooking.

Shunk Cut

Shunk is another type of cut that is taken from the lower leg of the ow and it has a rich and beefy flavor. This is the most flavorful cut of beef to use for the pot roast. And many of them prefer this cut as it is not much expensive and it saves a lot of money with a flavorful taste.

Top Side Roast

This top-side roast cut is very lean as it has many connecting tissues because that was taken from the inner thigh muscles of the hind leg. This top-side roast has a very slightly tough texture compared with the above cuts but still, it is packed with full of flavor. If you season this and sear it on a hot pan before cooking for a delicious and crisp exterior coating then you will love it.

Rump Cap

The rump cap is one of the best cuts for the pot roast and it is an excellent underused cut for roasting. The rump cap cut is the cut from the top piece of the beef rump and it will cook so fast, so make sure to use the thermometer to not overcook it. This rump cap is also known as picanha.

Read More:

Beef Cuts That You Need to Avoid For Pot Roast

As you have seen the topmost cuts of beef that will be good for the pot roast. Here we are going to provide you with the cuts that you need to avoid for a pot roast as they are not well-suited.

  • Flank Steak
  • Tenderloin
  • Sirloin
  • Strip Steak

These are not good for slow cooking as they are very lean and cook very fast and these are best for pan frying, roasting, grilling, and air frying.

Some of The Best Pot Roast Beef Recipes To Try

Now by looking at all the types of beef cuts for pot roast, you can easily bring the beef cut from the supermarket that is needed for beef roast. Here we will provide below the best pot roast beef recipes you need to try.

  • Perfect Pot Roast
  • Oven Pot Roast
  • Mississippi Pot Roast
  • Pot Roast Sandwich
  • Beef and Orzo Soup
  • Four Ingredient Slow Cooker Pot Roast
  • Beef Braised Pot Roast
  • Slow Cooked Brisket and Onions
  • Weekend Pot Roast
  • German Slow Cooker Pot Roast

Also, Check:

FAQs on Best Cuts of Beef For Pot Roast Slow Cooker

1. What is the best cut of meat for slow cooking?

Chuck shoulder, brisket, and round roast are the best cuts of meat for pot roast or slow cooking because they will have a good amount of fat and marbling which helps to keep the meat moist.

2. Why my pot roast is tough?

Your pot roast is tough because you may not be given enough time to cook the meat. Slow cooking always takes time and needs to provide enough time to cook.

3. Why is a chuck roast so expensive?

The chuck roast is very expensive as it has a good amount of meat with a high amount of fat.

Key Outcomes

We hope that the article provided you with an idea of the best cuts of beef for pot roast and it is very helpful to you too. Still, if you have any doubts you can comment to us in the comment section below. Whether you are tucking into any type of beef cut for pot roast you will enjoy the delicious and lovely pot roast.

Check out our website for more interesting dinner articles like Guinness Beef Stew and many more, even stay in touch with our site for more latest updates.


15 + Easy And Healthy Sous Vide Chicken Breast Recipes For Dinner

Sous Vide Chicken Breast Recipes: Every one of us loves to cook, juicy chicken every single time. But we may not get that perfect juicy chicken by grilling and baking then what about cooking chicken with sous vide, if you have it already and not known how to use it and how to make chicken recipes with it, you came to the perfect place as we are here to provide you the best recipes that you can make with this sous vide.

If you are hearing about this sous vide for the first time, look into the article to know everything about this sous vide and the recipes that were made with sous vide. Follow the complete article and cook all the chicken recipes with sous vide for the best succulent and juicy result instead of baking some chicken breasts or grilling a batch of thighs. This article is completely about the sous vide chicken breast recipes to cook juicy chicken. Why late, let’s get started!!

Sous Vide Chicken Breast Recipes

What is a Sous Vide?

Sous Vide is nothing but a machine that cooks vacuum-sealed meats, seafood, and veggies that are immersed in water. Even we can call it as a French slow cooker or meat hot tub. This device heats the container of water with a heated metal coil to the desired temperature and the food we have kept in a vacuum-packed bag will cook gradually in a completely controlled environment. And this machin is foolproof.

In this sous vide machines we have many types like units and immersion circulators. Units work like air fryers with small tanks of water and whereas immersion circulators are like immersion blenders most of them will have them in their kitchens as it works well and are inexpensive.

Easy & Best Sous Vide Chicken Breast Recipes For Dinner

Sous vide chicken breast recipes are the best chicken recipes that are very tasty that you may have ever tried. For these chicken recipes, you do not need to marinate or brine the chicken breasts, unlike traditional chicken recipes. Look into some of the best sous vide chicken breast recipes that we are providing below.

Sous Vide Chicken Breast With Garlic Butter

No need of worrying about overcooked or dry chicken anymore with this sous vide machine. By cooking this sous vide chicken breast with garlic butter for dinner your family will definetly praise you for eating the sft, moist and juicy chicken. And even it doesn’t need many ingredients to make it just needs some ingredients like butter, garlic, pepper, salt, and some herbs, and add them to the water along with the chicken.

Through this slow cooking process, chicken absorbs all the ingredients and gives you the best taste.

Sous Vide Chicken Breast with Lemon and Herbs

Many of us have chicken breast for dinner, it may take a long time in the kitchen by grilling or baking them. But with this sous vide machine, just by mixing all the ingredients in the water will give you the best chicken breast. For these sous vide chicken breasts with lemon and herbs, you need some ingredients like garlic, lemon, and thyme in water and add chicken to it.

When it is cooked at perfect temperature the chicken will be super juicy and tender.

Sous Vide Chicken Marsala

When it comes to chicken marsala, most of us know it is a date night or dinner party meal. Many of us may dislike chicken breast because of its dry nature. But cooking with this sous vide machine will definetly be a better way to eat the chicken breast with a juicy texture. Even if you are doing a dinner party you can just save your time by making chicken marsala with the sous vide.

Add all the ingredients with chicken breast in water and look at your work while it swims and cooks slowly.

Indian Butter Chicken

If you would like to try the Indian dish for the first time then make this Indian butter chicken as it is a great recipe to start with. To make this recipe you do not even need the fresh chicken, you can just use the leftover chicken too. The taste of it will be delicious and excellent with creamy, rich, Indian spiced sauce and tomatoes, onions, garlic, butter, and cream.

Serve it with rice naan, and with plenty of dishes.

Sous Vide Tomato Pesto Chicken

Make this sous vide tomato pesto chicken recipe tonight for dinner and you will not leave it and crave it all the time. You can cook this tomato pesto chicken recipe with the sous vide machine by adding the ingredients like pesto, sour cream, sauce, and sun-dried tomatoes. Even you can make this dish for dinner parties.

Read More:

Most Other Healthy Sous Vide Chicken Breast Recipes

As we have seen some of the chicken recipes that are cooked with the sous vide machine and here we are going to some more list of sous vide chicken breast recipes that are tasty and delicious.

  1. Sous Vide Cajun Boneless Chicken Breast with creamy Pan Sauce
  2. Sous Vide Chicken Breast with Mushroom sauce
  3. Sous Vide BBQ Chicken
  4. Basic Sous Vide Chicken Breast
  5. Mozerella and Herb Stuffed Chicken Breast Sous Vide style
  6. Sous Vide Teriyaki Chicken
  7. Sous Vide Chicken Parmesan
  8. Sous Vide Curried Chicken Salad
  9. Sous Vide Buttermilk Fried Chicken
  10. Grilled Rosemary Dijon Chicken
  11. Sous Vide Chicken Breast Corden Bleu
  12. Sous Vide Chicken Breast with Chicken and Herbs
  13. Sous Vide Chicken Breast
  14. Sous Vide Ham and Cheddar Stuffed Chicken

Also, Check:

FAQs on Sous Vide Chicken Breast Boneless Recipes

1. How Long does it take to cook the sous vide chicken breast?

To cook the sous vide chicken breast it takes 1 and 1/2 – 2 hours in between. Even if you cook longer than this it will not get overcooked.

2. Can we use ziplock bags for cooking chicken breast in sous vide?

Yes, you can use ziplock bags for cooking chicken breasts with sous vide. When you kept the chicken breasts in freezer-safe ziplock bags you need to squeeze out all the air and then lock the bag tightly.

3. Is cooking in sous vide healthy?

Yes, of course, the chicken that is cooked in sous vide will have more nutritional values like copper, iron, magnesium, and potassium, than food cooked in traditional methods.

4. How to prepare chicken breast when you think of cooking it in sous vide?

When you think to cook the chicken breasts in sous vide just season the chicken with salt and pepper, with the desired herbs, and then place them in ziplock bags.

5. Can we put frozen chicken in sous vide?

Yes, absolutely you can put frozen chicken too in sous vide but add extra 60 minutes to the time that you have set to cook the chicken breast.

Key Outcomes

By now you may get an idea of how you can cook sous vide chicken breast recipes easily without any effort. Try out all the recipes and comment to us about how they turned out and whether it is working well or not. Check out our website as we always share different recipes for people who love good food in less time. Share it with your friends if you really like it.

Bookmark our site for more interesting updates and recipes like Chicken a la King and many more.