Can You Freeze Cookies: Many of us love to bake cookies and we bake but sometimes, we overestimate and make a large batch of cookies or even for some reason sometimes we need to bake them before we need them at that time we might be wondering how to store them without going bad. If you are one among them then you are at the right place as we have provided you with the solution in this article.
Look into this comprehensive guide to know answers to all your queries like can you freeze cookies, how long can you freeze, how to defrost and many more are discussed. So without any delay, just start reading!!!
- Can You Freeze Cookies?
- How To Freeze Cookies?
- How To Freeze Cookie Dough?
- Freeze Drop Cookies Dough
- Freeze Slice and Bake Cookies Dough
- Freeze Cut-out Cookies Dough
- Tips To Know While Freezing Cookies
- How Long Can Cookies Stay Frozen?
- How To Defrost Baked Cookies & Cookie Dough?
- Can You Refreeze Cookies?
- Do Cookies Freeze Well?
- How To Bake Frozen Cookie Dough
- Can cookies with royal icing be frozen?
- Can premade cookie dough be frozen?
- Do cookies taste good after freezing?

Can You Freeze Cookies?
Yes, cookies can stay frozen. You can also freeze cookie dough. Make sure that you flash-freeze the cookies before freezing so that they do not stick to one another when frozen. But if your cookies are frosted or glazed they will freeze well.
How To Freeze Cookies?
Well, freezing cookies do not entail only wrapping them up and throwing them into the freezer. The process calls for more. Here is a step-by-step approach to freezing cookies.
- Make sure that your cookies are completely cooled and then place them on a baking tray lined with parchment paper. Take care that the cookies do not touch one another.
- The cookies should be frozen hard after three to four hours. You should then take out the tray from the freezer and remove the cookies from the tray.
- Keep the cookies in a freezer-safe bag and then place the bag into the freezer.
How To Freeze Cookie Dough?
Cookie dough can be frozen if you want freshly baked cookies after a few months without mixing the cookie dough. Here are the methods of doing so for different types of cookies.
Freeze Drop Cookies Dough
To freeze drop cookie dough, just roll balls with the cookie dough akin to how you would prepare them before baking them. Put them in a parchment or silicone-lined baking sheet. Freeze till the cookie dough is solid and put the dough balls into a freezer-safe bag. Squeeze out excess air and freeze.
Freeze Slice and Bake Cookies Dough
If you want to make slice-and-bake cookie dough take one or two logs out of the dough. Double wrap with cling film or plastic. This will ensure that the dough does not absorb any odor from the freezer and it will be protected from freezer burn.
Freeze Cut-out Cookies Dough
To freeze cut-out cookie dough you need to make flat discs out of the dough. Wrap the doubly in plastic and then place them in the freezer bags by labeling the name and date you need to place them in the freezer.
Tips To Know While Freezing Cookies
Now that you know how to freeze cookies, here are our top tips that will make your work easier.
- Freeze the dough instead of freezing the cookie. In this way, you can enjoy freshly baked cookies whenever you like without having to put in the effort of mixing the cookie dough. You can then take out as much as you want, bake them, and enjoy them.
- You need to consider what sort of ingredients you are using in your cookies. Iced cookies will not freeze nicely, nor will the cookies that have large chunks of ingredients.
- If you want the gooiness of the thawed cookies, reheat them in an oven for some minutes after defrosting them.
Related Articles:


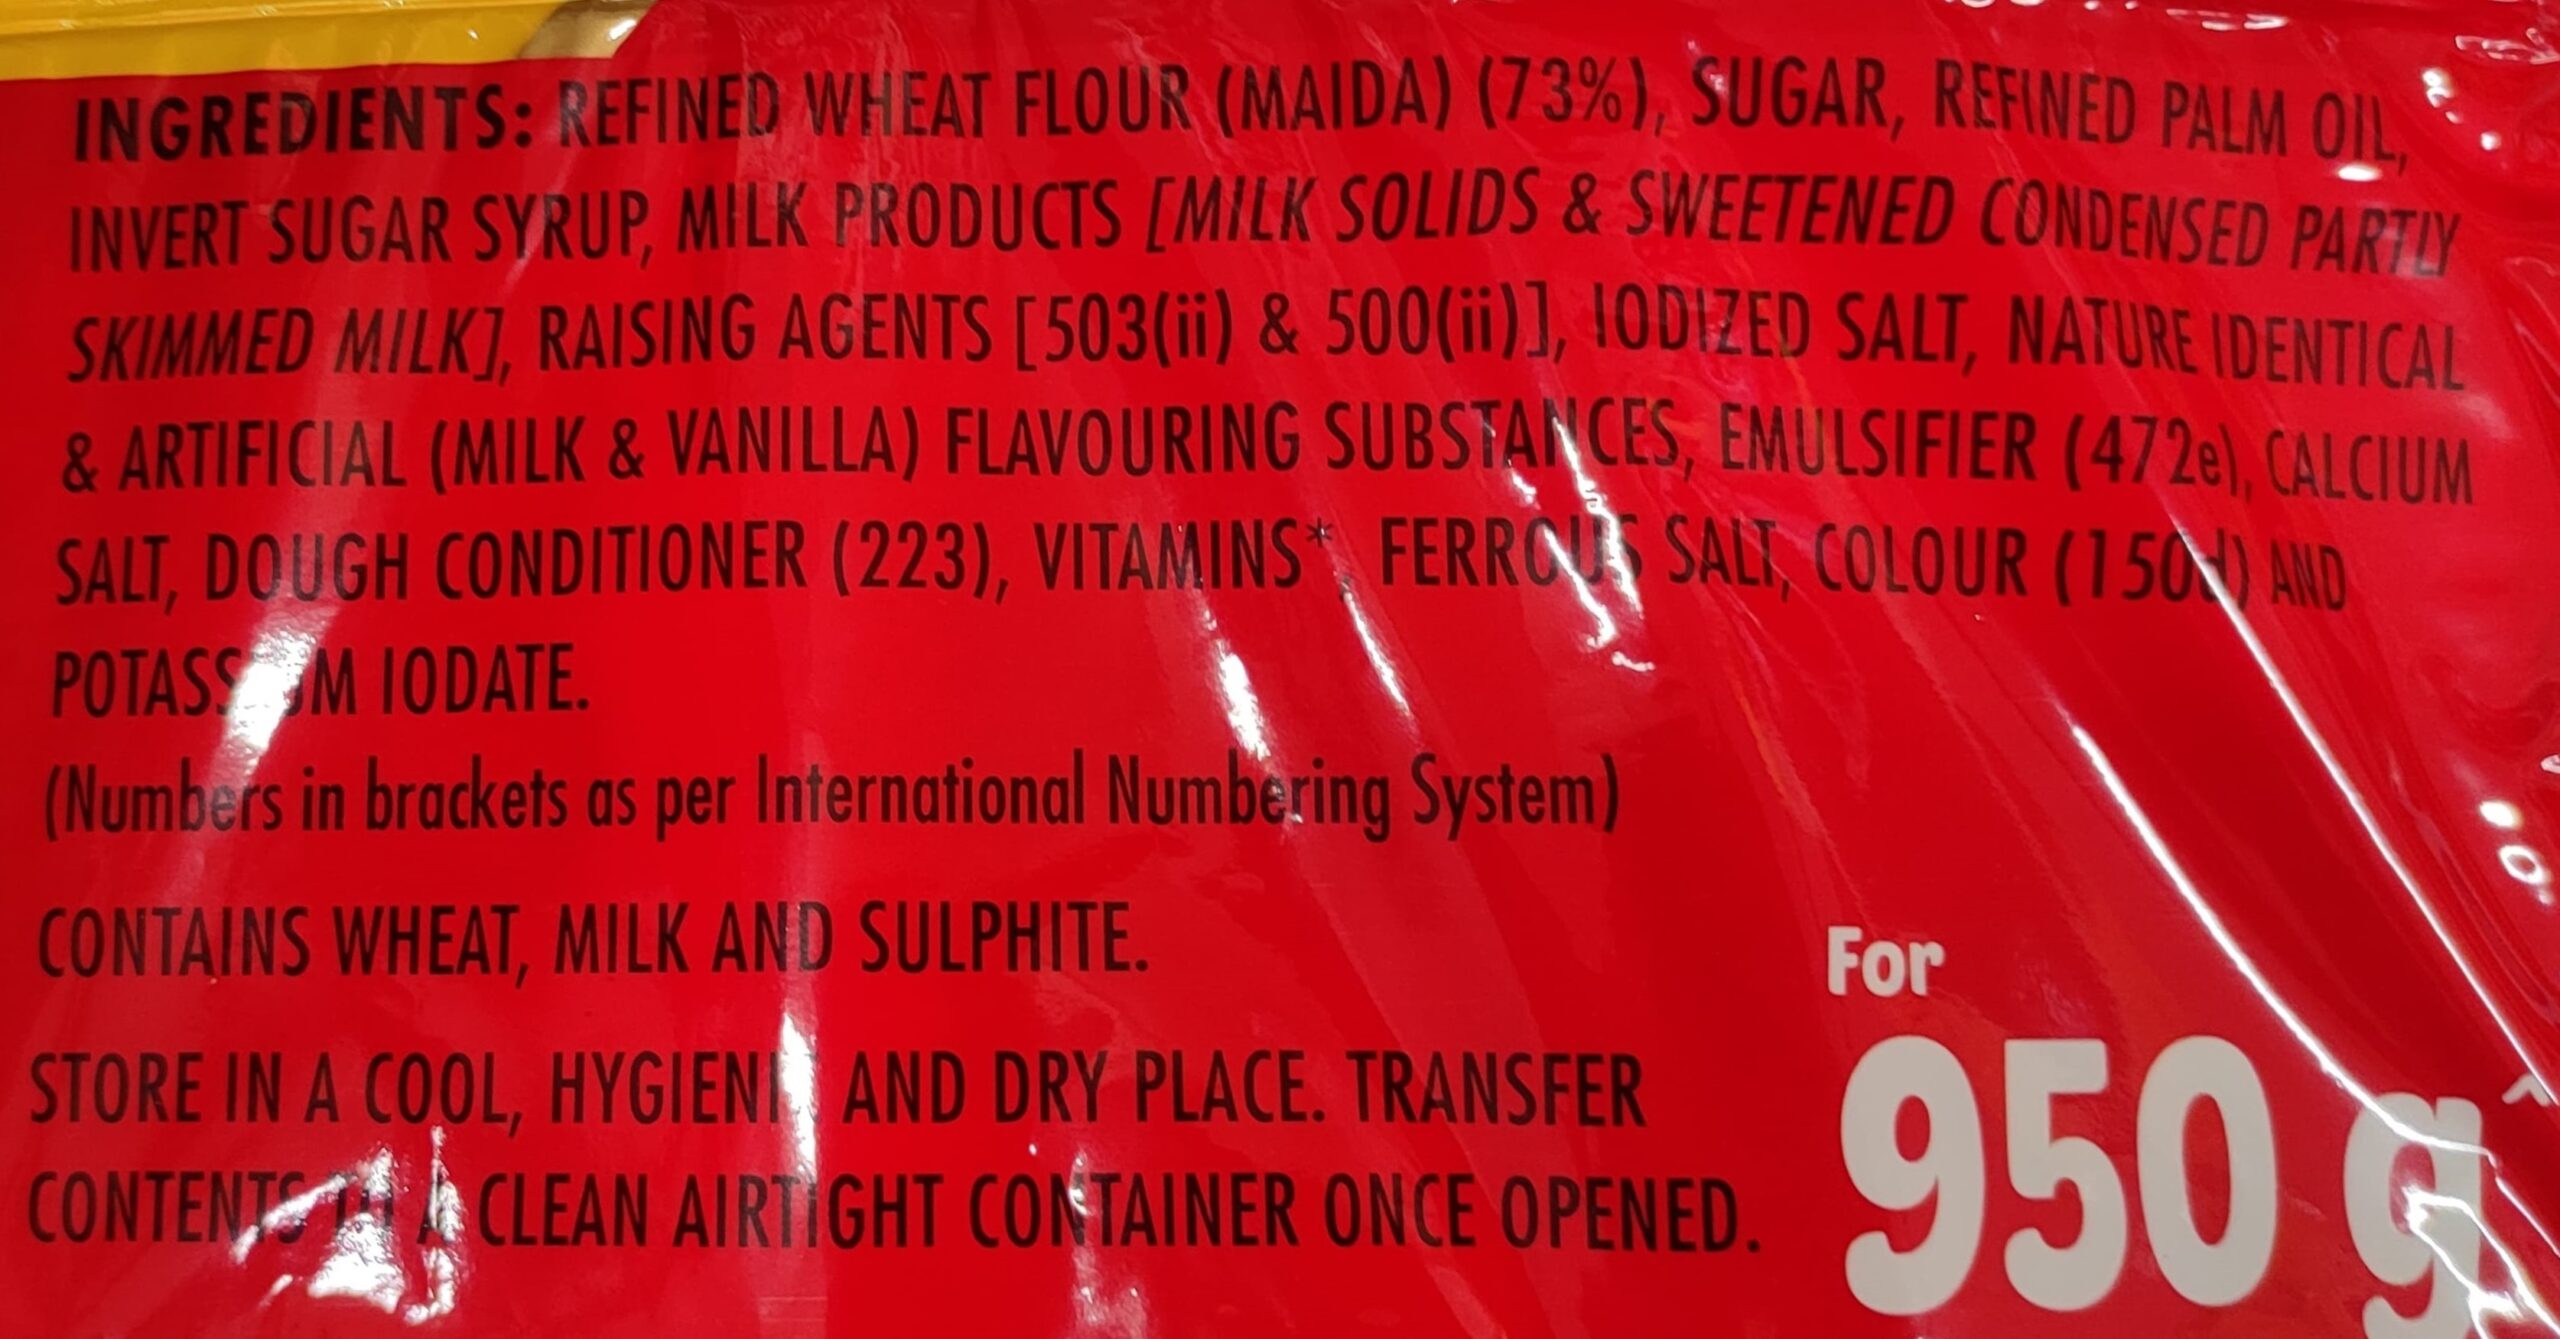
Ingredients:
Refined Wheat Flour (Maida), Sugar, Edible Vegetable Oil (Palm), Dry Fruits (8%) [Blackcurrant, Papaya {Papaya Cubes, Sugar, Acidity Regulator (INS 330)}, Cranberry], Nuts (4%) (Cashew Bits, Almond Bits), Butter, Liquid Glucose, Date Syrup, Milk Solids, Leavening Agents (INS 503 ii, INS 500 ii), Emulsifier (INS 322 from Soy), Iodised Salt, Spices (Clove and Nutmeg). Allergen Advice: Contains Wheat, Milk, Soy, and Nut.
Nutritional Information
Number of Servings per Container – 16.66
Serving Size – 30g (4 Cookies)
| Nutrients | Quantity per 100 g | Quantity per Serving | %RDA per Serving |
| Energy | 458 kcal | 137 kcal | 6.8 |
| Protein | 6.4 g | 1.9 g | – |
| Total Fat | 20 g | 6 g | 8.9 |
| Saturated Fat | 9 g | 2.7 g | 12.3 |
| Monounsaturated Fat | 4.5 g | 1.3 g | – |
| Polyunsaturated Fat | 1.2 g | 0.4 g | – |
| Trans Fat | 0 g | 0 g | 0 |
| Cholesterol | 0 mg | 0 mg | – |
| Carbohydrate | 63 g | 19 g | – |
| Total Sugars | 25 g | 7.5 g | – |
| Added Sugars | 21.5 g | 6.4 g | 12.8 |
| Sodium | 209 mg | 63 mg | 3.1 |
*All specified values are averages.
% Calculated based on reference daily energy intake value of 2000 kcal.
How Long Can Cookies Stay Frozen?
If you are freezing baked cookies then they will stay frozen for around 30 days. Their flavor and texture will both degrade after this time. If you are freezing cookie dough, it will last for around three to four months in the freezer.
How To Defrost Baked Cookies & Cookie Dough?
An already-baked cookie can be defrosted on the countertop at room temperature for a couple of hours after removing it from the freezer. It can be thrown into a pre-warmed oven for fifteen minutes if you want to enjoy it warm. The cookies can also be microwaved at 10 to 15-second intervals.
Defrosting cookie dough would need a little bit more planning. You have to remove the dough from the freezer first and keep it in the refrigerator till it is defrosted. This will take a few hours, therefore, if you wish to bake them in the evening, bring them out in the morning.
Can You Refreeze Cookies?
Yes, cookies can be refrozen but you might want to consider if it is worth doing so. The defrosted cookies when refrozen get drier and the taste will become stale. Therefore we strongly advise that you only defrost the cookies you need at a time and avoid refreezing.
Do Cookies Freeze Well?
Yes, cookies freeze well but there are some conditions to follow, as they should not be frosted, or glazed. You can also freeze cookie dough to enjoy warm straight-from-the-oven cookies.
How To Bake Frozen Cookie Dough
Till now, we have seen the freezing, & thawing of cookies and cookie dough and now we are going to look at the process of baking frozen cookie dough. Follow the steps below carefully. You can do this with any shape of cookie dough that you have frozen.
- Firstly you need to defrost the frozen cookie dough as we have seen in the above defrosting process.
- Even you can use frozen cookie dough directly to make cookies but you need to keep them in the oven for some extra time than normal.
FAQs On Can You Freeze Chocolate Chip Cookies
1. Can cookies with royal icing be frozen?
Though it is possible, there is a cautionary catch here. It might be so that the icing texture transforms drastically if it is frozen. It is advisable to freeze naked cookies and put the icing after thawing them.
2. Can premade cookie dough be frozen?
You can freeze most premade cookie dough that you can buy in the supermarket at home. The packaging must always be checked for that cookie dough so that you get to know whether it can be frozen or not.
3. Do cookies taste good after freezing?
Yes, cookies taste good even after freezing and thawing them. If you properly freeze them as we have shown in our article.
Key Takeaways
Freezing both cookies and cookie dough is easy, you only need to flash-freeze them at first. I hope that this article demystifies the process of freezing cookies and cookie dough for you and you do it with ease. If you want to ask any questions, please write to us in the comment section and you will be answered by a staff member soon.
Do visit our website canyourpreserve.com for more such articles like can you freeze cookie dough and many more.